Framework-agnostic changelog SDK with a headless core plus first-party adapters for Next.js, Nuxt, Vue 3, Express, and React.
changelog-sdk is designed for teams that want to ship updates faster while keeping changelog UX clean, searchable, and isolated from host app styles.
- Table of Contents
- Why Changelog SDK
- Features
- Requirements
- Quick Start (Next.js)
- Package Surfaces
- Nuxt Quick Start
- React Quick Start (Any Backend)
- Express Quick Start
- Vue 3 Quick Start
- Routing
- Environment Variables
- Usage
- API and Server Actions
- Advanced: Custom Adapter
- TypeScript Types and Schemas
- Styling and CSS Isolation
- Security
- Troubleshooting
- Development (SDK Contributors)
- Landing Page (GitHub Pages)
- License
- Core business logic is framework-agnostic and adapter-driven
- First-party Next.js app-router adapter with React Server Component UI
- First-party Nuxt/Nitro adapter (headless API handlers)
- React adapter for any backend (Next, Nuxt, Express, or custom REST)
- Vue 3 UI component library that pairs with the Nuxt adapter
- Express router adapter for the REST API
- Admin authentication with HTTP-only, HMAC-signed cookie sessions
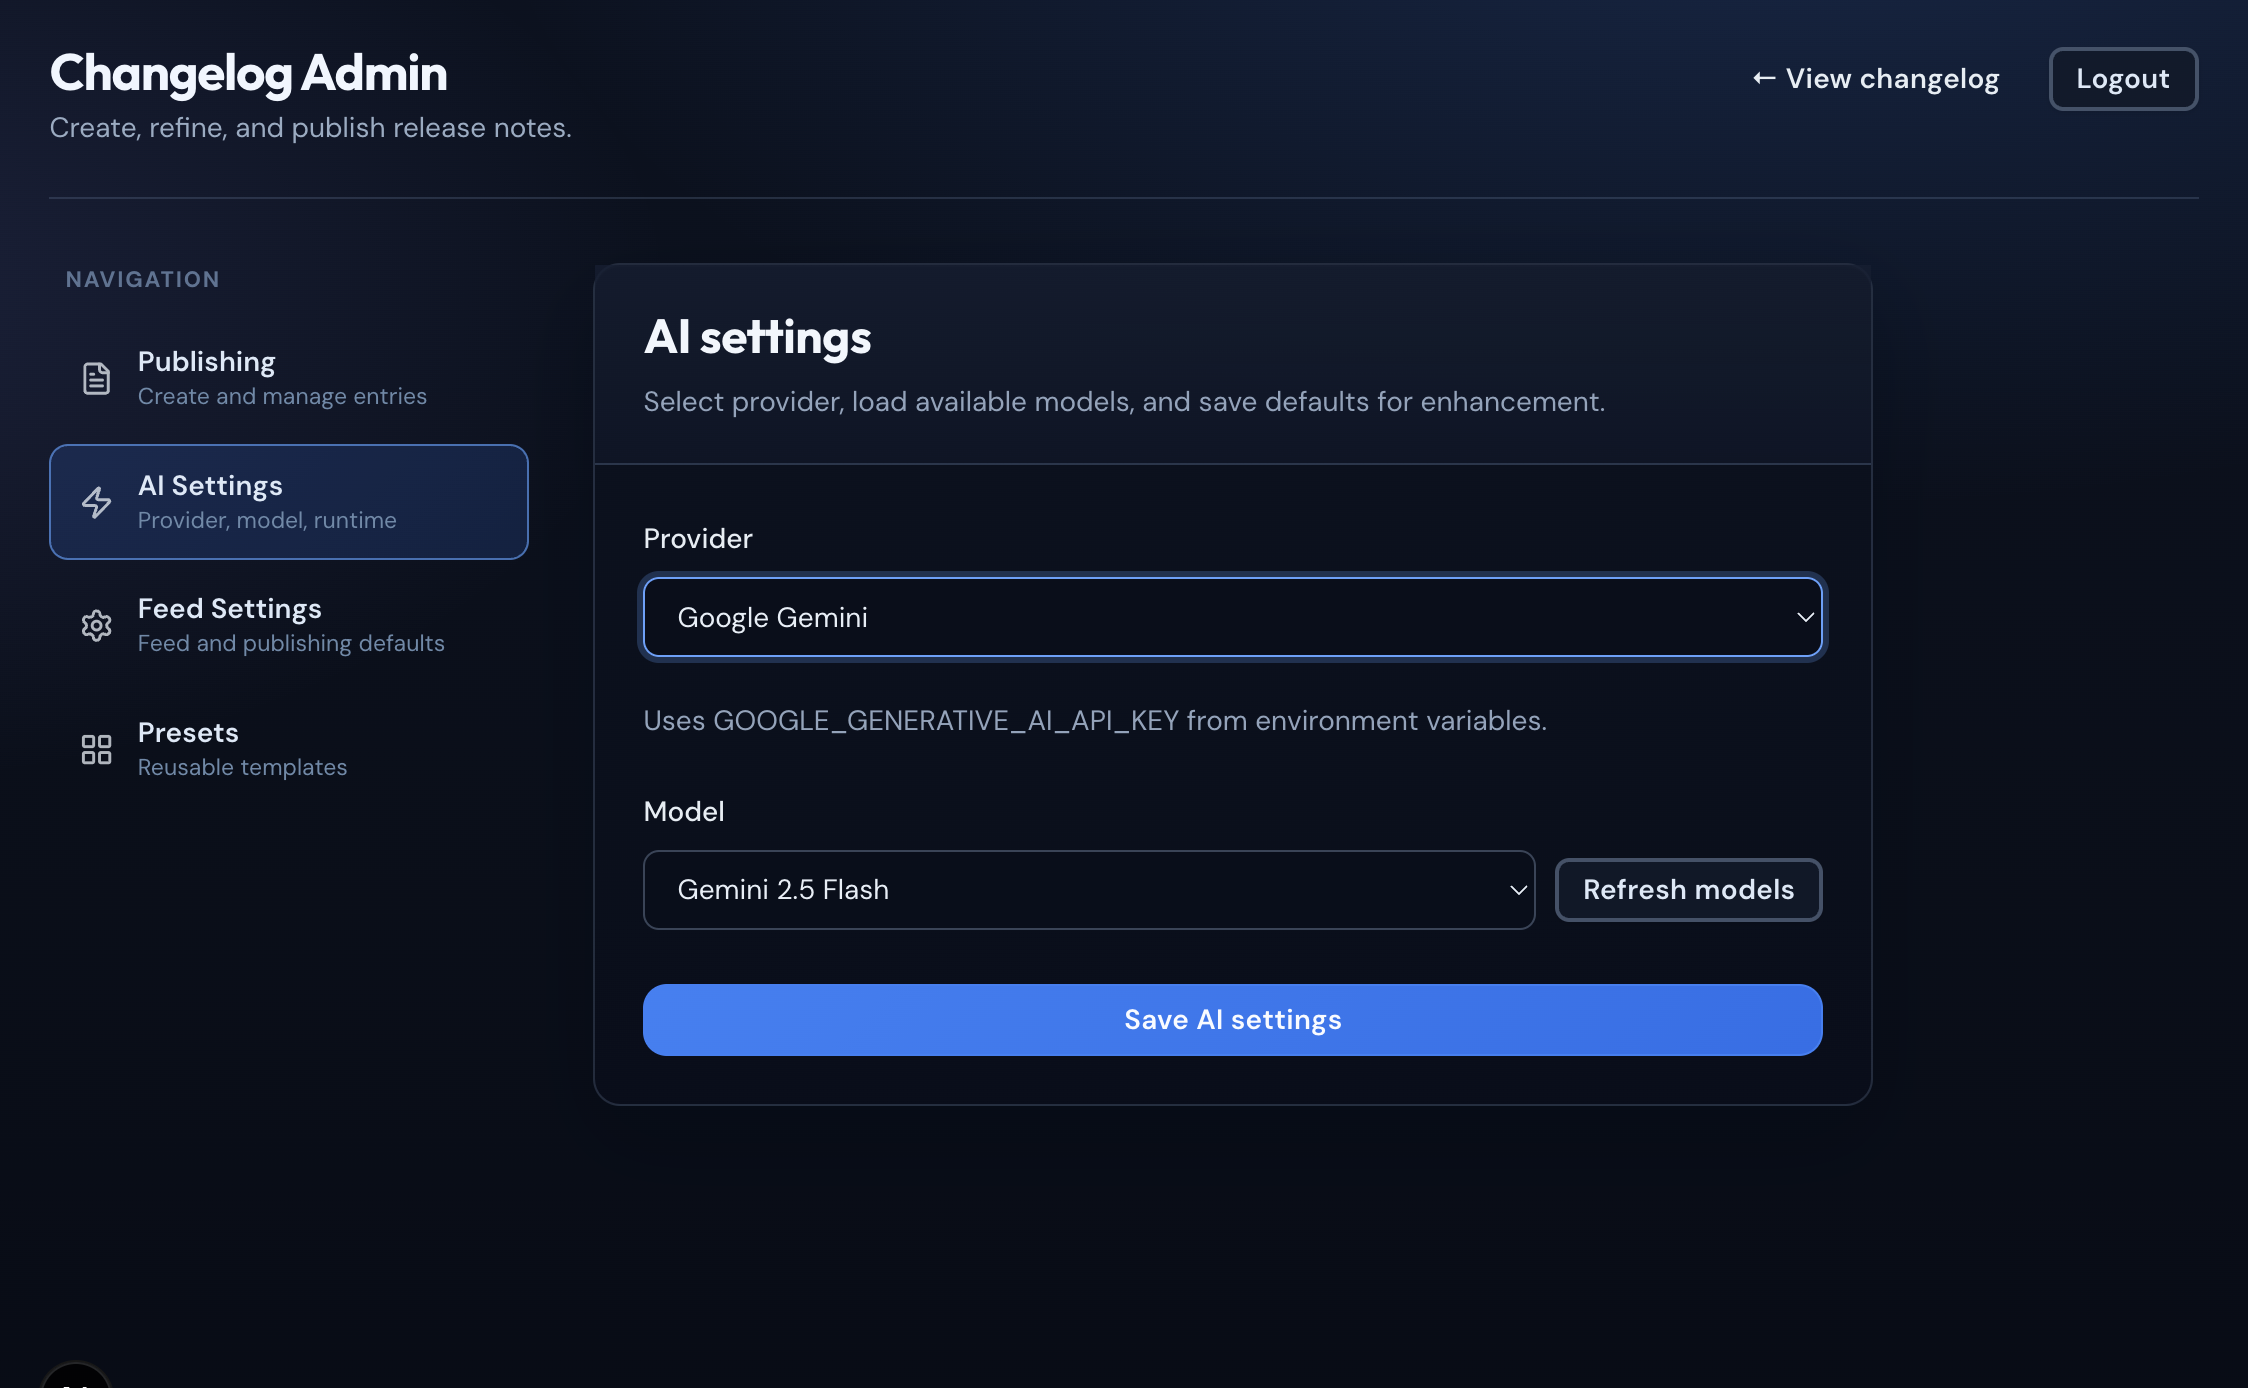
- AI enhancement via OpenAI, Gemini, and Ollama
- Isolated
cl-prefixed UI styles — no Tailwind required in host app - Typed server actions and Zod-validated inputs throughout
- Public changelog feed at
/changelogwith search, filtering, and pagination - Admin portal at
/changelog/adminfor creating, editing, and publishing entries - AI-powered writing assistance — turn raw notes into polished release updates
- Repository-to-changelog automation — generate drafts from GitHub or Bitbucket commits
- Secure auth flow using MongoDB-backed admin users and signed cookie sessions
- Type-safe API surface with TypeScript and Zod schemas
- Adapter architecture:
core,next,mongoose,nuxt,react,vue, andexpresspackage surfaces - Semver enforcement — prevents publishing changelogs with a lower or duplicate version
- Node.js
>= 20 - Next.js
>= 16(for the Next.js adapter) - React
>= 18(for the React/Next adapters) - MongoDB database
bun add changelog-sdk
# or
npm install changelog-sdk
Optional: AI Enhancement
Install one or more AI provider packages to enable AI-powered changelog writing:
# OpenAI (default model: gpt-4o-mini)
bun add ai @ai-sdk/openai

# Google Gemini (default model: gemini-2.5-flash)
bun add ai @ai-sdk/google

# Ollama — local inference (default model: llama2)
bun add ai ollama-ai-provider-v2MongoDB and Mongoose must be treated as server-only external packages. Add the following to your next.config.js:
/** @type {import('next').NextConfig} */
const nextConfig = {
  serverExternalPackages: ['mongodb', 'mongoose'],
}

module.exports = nextConfigCreate app/changelog/layout.tsx. This layout loads the SDK's isolated stylesheet and must wrap your changelog route:
import 'changelog-sdk/styles'

export default function ChangelogLayout({ children }: { children: React.ReactNode }) {
  return <>{children}</>
}Create app/changelog/[[...route]]/page.tsx:
import { Suspense } from 'react'
import { ChangelogManager } from 'changelog-sdk/next'

interface ChangelogPageProps {
  params: Promise<{ route?: string[] }>
  searchParams: Promise<{ page?: string; tags?: string; search?: string; preset?: string }>
}

export const metadata = {
  title: 'Changelog',
  description: 'View our latest updates and improvements',
}

export default function ChangelogPage(props: ChangelogPageProps) {
  return (
    <Suspense>
      <ChangelogPageContent {...props} />
    </Suspense>
  )
}

async function ChangelogPageContent({ params, searchParams }: ChangelogPageProps) {
  const [resolvedParams, resolvedSearchParams] = await Promise.all([params, searchParams])
  return <ChangelogManager params={resolvedParams} searchParams={resolvedSearchParams} />
}
If your changelog is mounted under a nested route (for example /members/changelog), pass basePath so internal links and redirects stay scoped to that mount:
return <ChangelogManager params={resolvedParams} searchParams={resolvedSearchParams} basePath="/members/changelog" />Create .env.local in your project root:
# MongoDB connection string
CHANGELOG_MONGODB_URI=mongodb+srv://user:password@cluster.mongodb.net/changelog?retryWrites=true&w=majority

# Create your first admin account with:
# bun run create:admin your-admin@email.com your-password "Admin"

# Optional: keep UI registration enabled
CHANGELOG_ALLOW_ADMIN_REGISTRATION=true
# Next.js fallback (optional): NEXT_PUBLIC_CHANGELOG_ALLOW_ADMIN_REGISTRATION=true
# Nuxt fallback (optional): NUXT_PUBLIC_CHANGELOG_ALLOW_ADMIN_REGISTRATION=true
# Generic fallback (optional): PUBLIC_CHANGELOG_ALLOW_ADMIN_REGISTRATION=true

# Session signing secret — minimum 32 characters, required for secure sessions
CHANGELOG_SESSION_SECRET=your-random-secret-at-least-32-chars

# Encryption key for repository tokens (32 bytes, base64 or hex)
CHANGELOG_ENCRYPTION_KEY=base64:your-32-byte-key

# AI provider: openai | gemini | ollama
CHANGELOG_AI_PROVIDER=openai

# Provider API keys
OPENAI_API_KEY=sk-...
GOOGLE_GENERATIVE_AI_API_KEY=...
OLLAMA_BASE_URL=http://localhost:11434

# Optional: AI rate limit (requests per minute, default: 10)
CHANGELOG_RATE_LIMIT=10To protect /changelog/admin with server-side session verification, add authMiddleware to your middleware.ts:
// middleware.ts (at your project root)
import { authMiddleware } from 'changelog-sdk/next'
import type { NextRequest } from 'next/server'

export function middleware(request: NextRequest) {
  return authMiddleware(request, { basePath: '/changelog' })
}

export const config = {
  matcher: ['/changelog/:path*'],
}
The middleware redirects unauthenticated requests to /changelog/login automatically.
bun run dev
# or
npm run dev| Import | Description |
|---|---|
changelog-sdk or changelog-sdk/core |
Framework-agnostic core service, ports, schemas, and types |
changelog-sdk/next |
Next.js server actions, middleware, and React UI components |
changelog-sdk/mongoose |
MongoDB repository implementations |
changelog-sdk/nuxt |
Nuxt/Nitro H3 event handlers (headless API) |
changelog-sdk/react |
React UI components + REST client for any backend |
changelog-sdk/vue |
Vue 3 UI components and headless API client |
changelog-sdk/express |
Express router + handlers for the REST API |
changelog-sdk/styles |
Isolated cl- prefixed CSS stylesheet |
bun add changelog-sdk h3 vue
# or
npm install changelog-sdk h3 vueCreate .env in your project root (same variables as the Next.js adapter):
CHANGELOG_MONGODB_URI=mongodb+srv://...
CHANGELOG_SESSION_SECRET=your-random-secret-at-least-32-chars
CHANGELOG_ENCRYPTION_KEY=base64:your-32-byte-key
CHANGELOG_AI_PROVIDER=openai
OPENAI_API_KEY=sk-...Wire handler functions to Nuxt server routes in server/api/changelog/:
// server/api/changelog/feed.get.ts
import { createNuxtChangelogHandlers } from 'changelog-sdk/nuxt'
const handlers = createNuxtChangelogHandlers()
export default handlers.getPublishedFeed
// server/api/changelog/entries.post.ts
import { createNuxtChangelogHandlers } from 'changelog-sdk/nuxt'
const handlers = createNuxtChangelogHandlers()
export default handlers.createEntry// server/api/changelog/entries/[id].patch.ts
import { createNuxtChangelogHandlers } from 'changelog-sdk/nuxt'
const handlers = createNuxtChangelogHandlers()
export default handlers.updateEntry// server/api/changelog/entries/[id].delete.ts
import { createNuxtChangelogHandlers } from 'changelog-sdk/nuxt'
const handlers = createNuxtChangelogHandlers()
export default handlers.deleteEntry// server/api/changelog/entries/[slug].get.ts
import { createNuxtChangelogHandlers } from 'changelog-sdk/nuxt'
const handlers = createNuxtChangelogHandlers()
export default handlers.getEntryBySlug// server/api/changelog/admin/login.post.ts
import { createNuxtChangelogHandlers } from 'changelog-sdk/nuxt'
const handlers = createNuxtChangelogHandlers()
export default handlers.login// server/api/changelog/admin/logout.post.ts
import { createNuxtChangelogHandlers } from 'changelog-sdk/nuxt'
const handlers = createNuxtChangelogHandlers()
export default handlers.logout// server/api/changelog/admin/enhance.post.ts
import { createNuxtChangelogHandlers } from 'changelog-sdk/nuxt'
const handlers = createNuxtChangelogHandlers()
export default handlers.enhanceAll handlers return the same response shapes as the Next.js server actions.
For automatic release-note generation from branch merges, add a webhook route:
// server/api/changelog/webhooks/repo.post.ts
import { createNuxtChangelogHandlers } from 'changelog-sdk/nuxt'
const handlers = createNuxtChangelogHandlers()
export default handlers.processRepoWebhook
Full list of available handlers:
| Handler | Method | Description |
|---|---|---|
getPublishedFeed |
GET | Public paginated feed (query: page, limit, tags, search) |
getAdminFeed |
GET | Admin paginated feed (query: page, limit) |
getAdminEntryById |
GET | Fetch single entry by ID (param: id) |
getEntryBySlug |
GET | Fetch single entry by slug (param: slug) |
createEntry |
POST | Create a new entry |
updateEntry |
PATCH | Update an existing entry (body includes id) |
deleteEntry |
DELETE | Delete an entry (param: id) |
login |
POST | Admin login (body: { email, password }) |
register |
POST | Create first admin account (body: { email, password, displayName? }) |
canRegister |
GET | Returns whether initial admin registration is currently allowed |
logout |
POST | Admin logout |
enhance |
POST | AI enhancement (body: { rawNotes, currentVersion? }) |
getAISettings |
GET | Fetch AI provider settings |
updateAISettings |
POST | Update AI provider settings |
listModels |
POST | List available models (body: { provider, ollamaBaseUrl? }) |
getChangelogSettings |
GET | Fetch feed/publishing settings |
updateChangelogSettings |
POST | Update feed/publishing settings |
getLatestPublishedVersion |
GET | Get the latest published semver |
processRepoWebhook |
POST | Process a GitHub push or Bitbucket repo:push event and auto-create a changelog for the watched branch |
Once the API is set up, mount ChangelogManager in a Vue page:
import { useRoute } from 'vue-router'
import { ChangelogManager } from 'changelog-sdk/vue'
import 'changelog-sdk/styles'

const route = useRoute()
const params = {
  route: Array.isArray(route.params.route)
    ? route.params.route
    : [String(route.params.route || '')]
}
const searchParams = route.query as { page?: string; tags?: string; search?: string }<template>
<ChangelogManager :params="params" :searchParams="searchParams" />
</template>bun add changelog-sdk
# or
npm install changelog-sdk// ChangelogRoute.tsx (React Router example)
import { ChangelogManager } from 'changelog-sdk/react'
import 'changelog-sdk/styles'
import { useParams, useSearchParams } from 'react-router-dom'
export default function ChangelogRoute() {
const params = useParams()
const [searchParams] = useSearchParams()
const routeParam = params['*'] || ''
const route = routeParam ? routeParam.split('/') : []
const search = Object.fromEntries(searchParams.entries()) as {
page?: string
tags?: string
search?: string
preset?: string
}
return (
<ChangelogManager
params={{ route }}
searchParams={search}
basePath="/changelog"
apiBasePath="/api/changelog"
/>
)
}If your API lives on another domain, pass baseUrl.
bun add changelog-sdk express
# or
npm install changelog-sdk expressimport express from 'express'
import { createExpressChangelogRouter } from 'changelog-sdk/express'
const app = express()
app.use('/api/changelog', createExpressChangelogRouter())
app.listen(3000)Override environment variables or database for a specific route:
app.use('/api/changelog', createExpressChangelogRouter({
envOverrides: {
CHANGELOG_MONGODB_URI: 'mongodb://custom-host/changelog',
},
allowAdminRegistration: false,
bodyLimit: '1mb',
}))Run multiple independent changelog instances from the same app:
import { createMultipleChangelogRouters } from 'changelog-sdk/express'
const routers = createMultipleChangelogRouters({
'product-a': {
envOverrides: { CHANGELOG_MONGODB_URI: 'mongodb://db-a/changelog' },
},
'product-b': {
envOverrides: { CHANGELOG_MONGODB_URI: 'mongodb://db-b/changelog' },
},
})
for (const [name, router] of Object.entries(routers)) {
app.use(`/api/changelog/${name}`, router)
}The Express adapter enables CSRF protection by default. SDK clients send the header automatically. If you build your own client, read the changelog-csrf cookie and send it as x-csrf-token on POST, PATCH, PUT, and DELETE requests.
Webhook requests to /api/changelog/webhooks/repo bypass CSRF so GitHub and Bitbucket can post directly.
bun add changelog-sdk
# or
npm install changelog-sdkimport 'changelog-sdk/styles'
import { ChangelogManager } from 'changelog-sdk/vue'import { useRoute } from 'vue-router'
import { ChangelogManager } from 'changelog-sdk/vue'
const route = useRoute()
const params = {
route: Array.isArray(route.params.route)
? route.params.route
: [String(route.params.route || '')]
}
const searchParams = route.query as { page?: string; tags?: string; search?: string }<template>
<ChangelogManager :params="params" :searchParams="searchParams" />
</template>By default the Vue UI calls /api/changelog. Override with:
<ChangelogManager
  apiBasePath="/api/changelog"
  baseUrl="https://api.example.com"
/>For custom UI, use createChangelogApi to interact with the backend:
import { createChangelogApi } from 'changelog-sdk/vue'

const api = createChangelogApi({ apiBasePath: '/api/changelog' })

const feed = await api.getFeed({ page: 1, limit: 10, tags: ['Features'] })
const entry = await api.getEntryBySlug('v1-2-0')
const enhanced = await api.enhance({ rawNotes: 'Fixed bugs, added dark mode', currentVersion: '1.2.0' })Once configured, the following routes are available out of the box:
| URL | Description |
|---|---|
/changelog |
Public changelog feed |
/changelog/<slug> |
Individual changelog detail |
/changelog/login |
Admin login |
/changelog/admin |
Admin dashboard — publishing |
/changelog/admin/ai |
Admin AI provider settings |
/changelog/admin/changelog-settings |
Admin feed and publishing defaults |
/changelog/admin/repo |
Admin repository settings |
/changelog/admin/presets |
Admin entry presets |
| Variable | Required | Description |
|---|---|---|
CHANGELOG_MONGODB_URI |
Yes | MongoDB connection string |
CHANGELOG_SESSION_SECRET |
Recommended | HMAC signing secret (min 32 chars). Falls back to NEXTAUTH_SECRET or NUXT_SESSION_PASSWORD. A missing or short secret degrades session security. |
CHANGELOG_ALLOW_ADMIN_REGISTRATION |
No | Set to true to allow creating admin accounts from /changelog/login even after the first admin exists. Fallback order: Next.js → NEXT_PUBLIC_ then PUBLIC_; Nuxt → NUXT_PUBLIC_ then PUBLIC_; Express → PUBLIC_ only. |
CHANGELOG_LOG_ENV |
No | Set to true to log environment-variable resolution once per server process (useful for debugging). |
CHANGELOG_ENCRYPTION_KEY |
Required for repo tokens | 32-byte key used to encrypt repository access tokens (prefix with base64: or hex:) |
CHANGELOG_AI_PROVIDER |
No | openai, gemini, or ollama |
OPENAI_API_KEY |
If OpenAI | API key for OpenAI |
GOOGLE_GENERATIVE_AI_API_KEY |
If Gemini | API key for Google Gemini |
OLLAMA_BASE_URL |
If Ollama | Base URL for local Ollama instance (e.g. http://localhost:11434) |
CHANGELOG_RATE_LIMIT |
No | AI calls per minute (default: 10) |
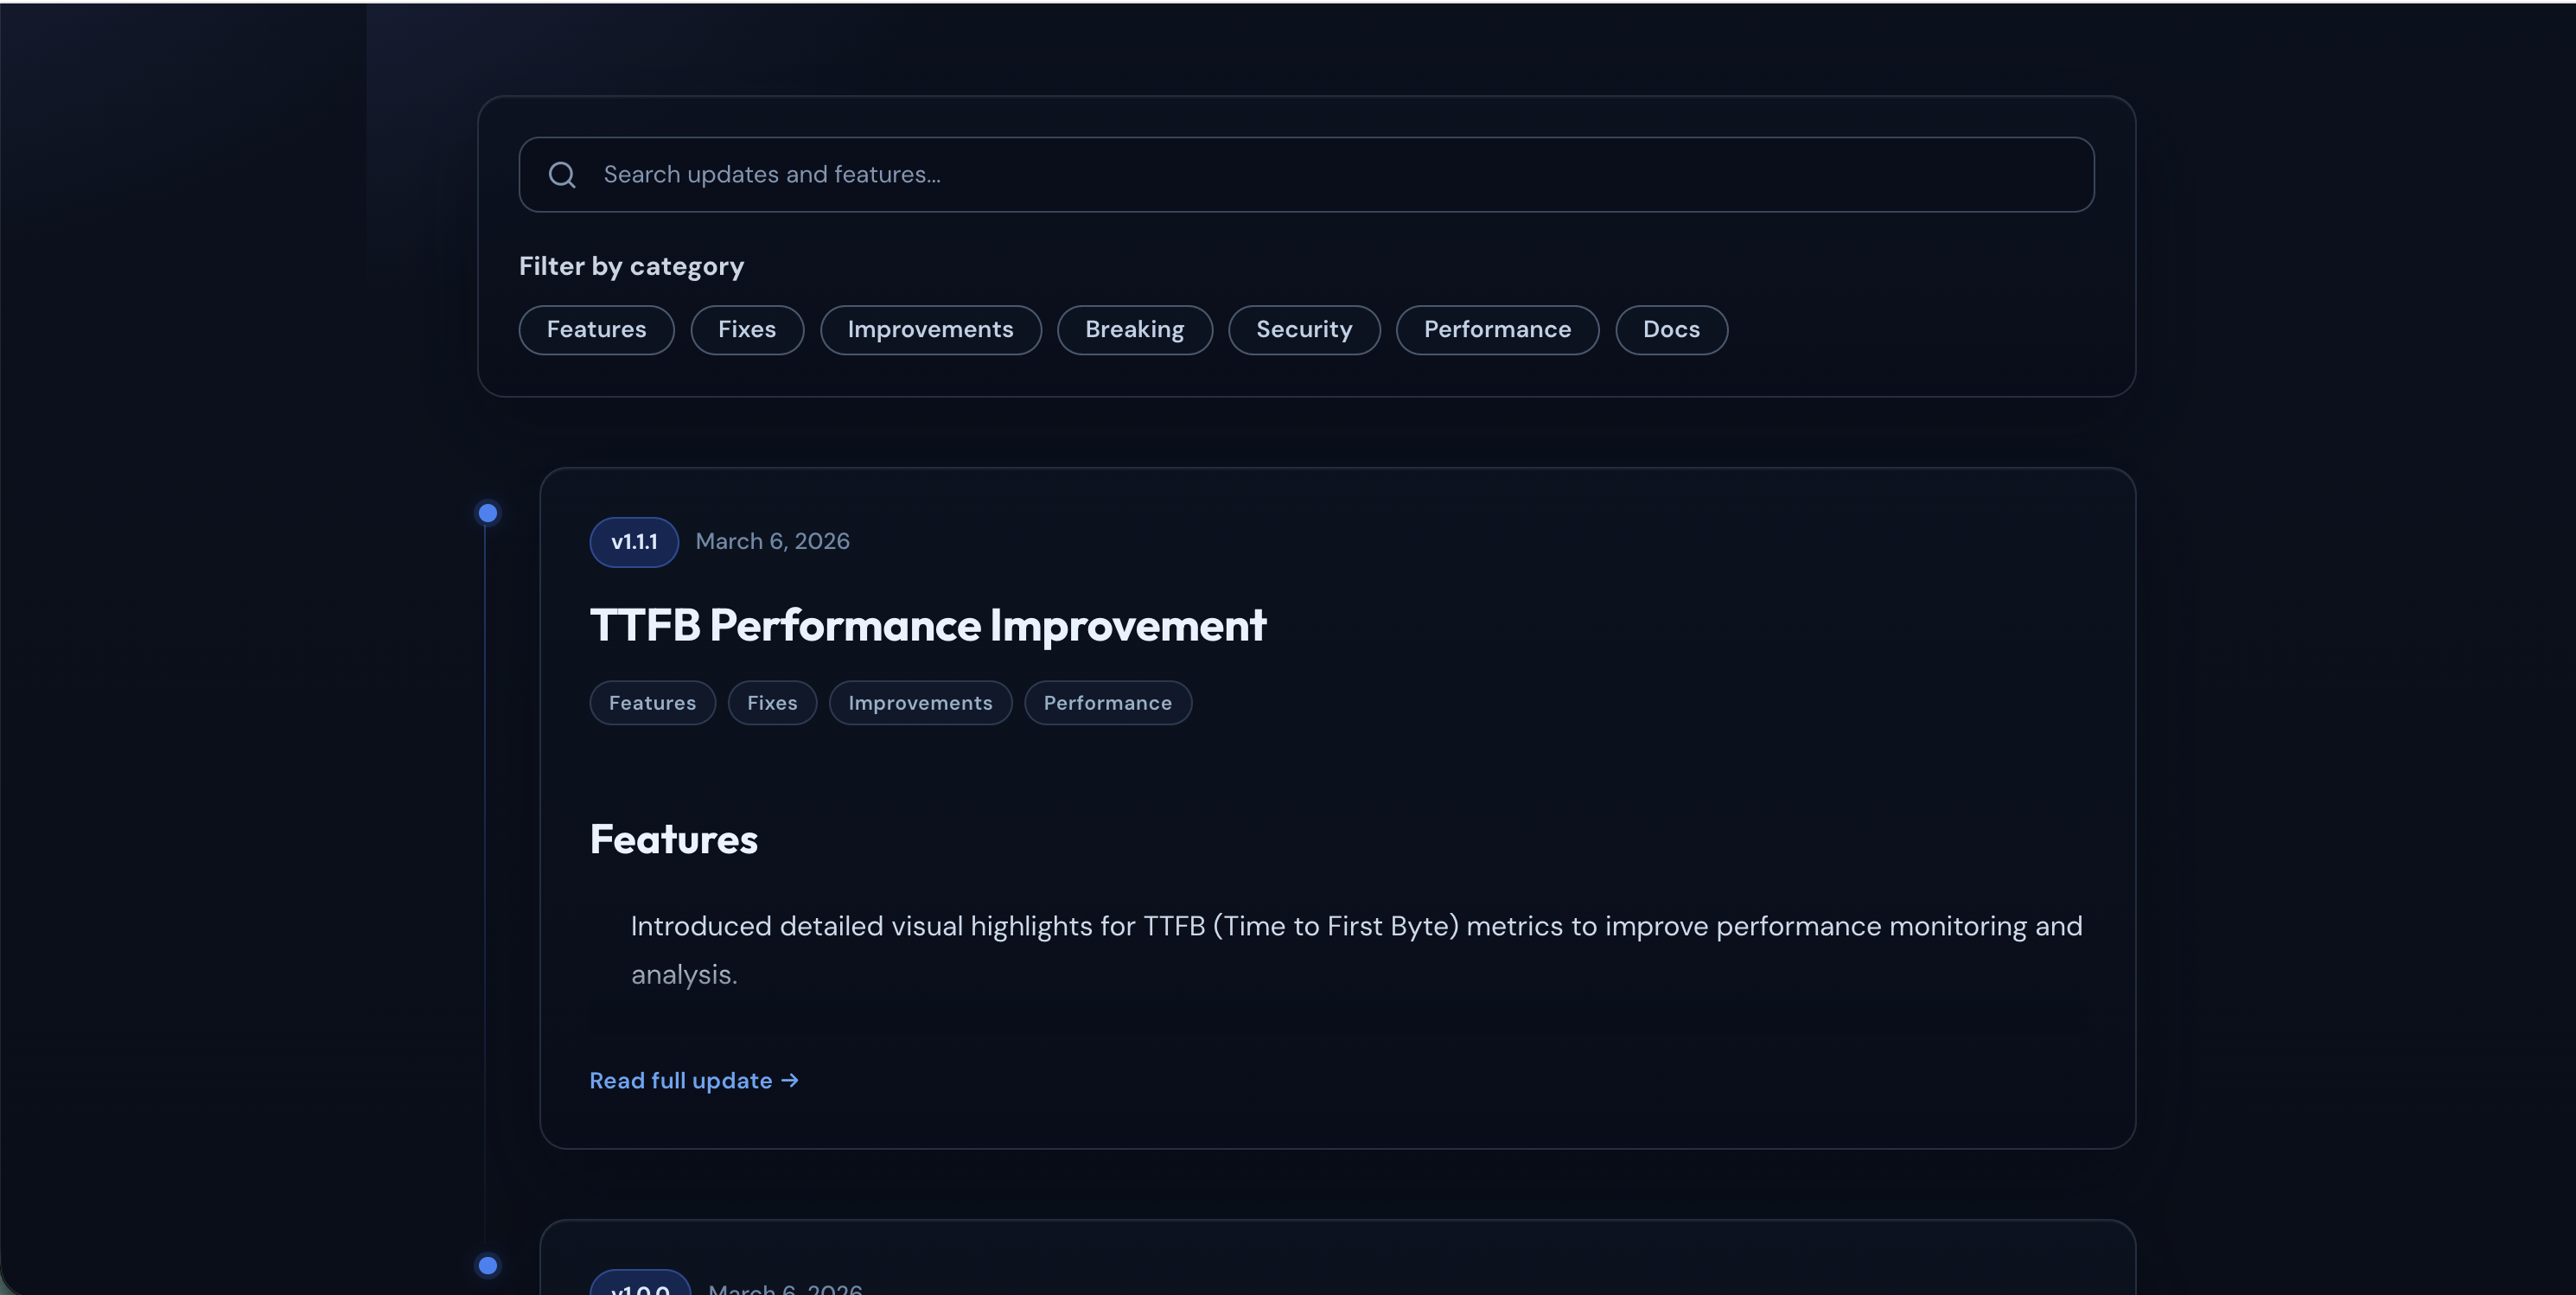
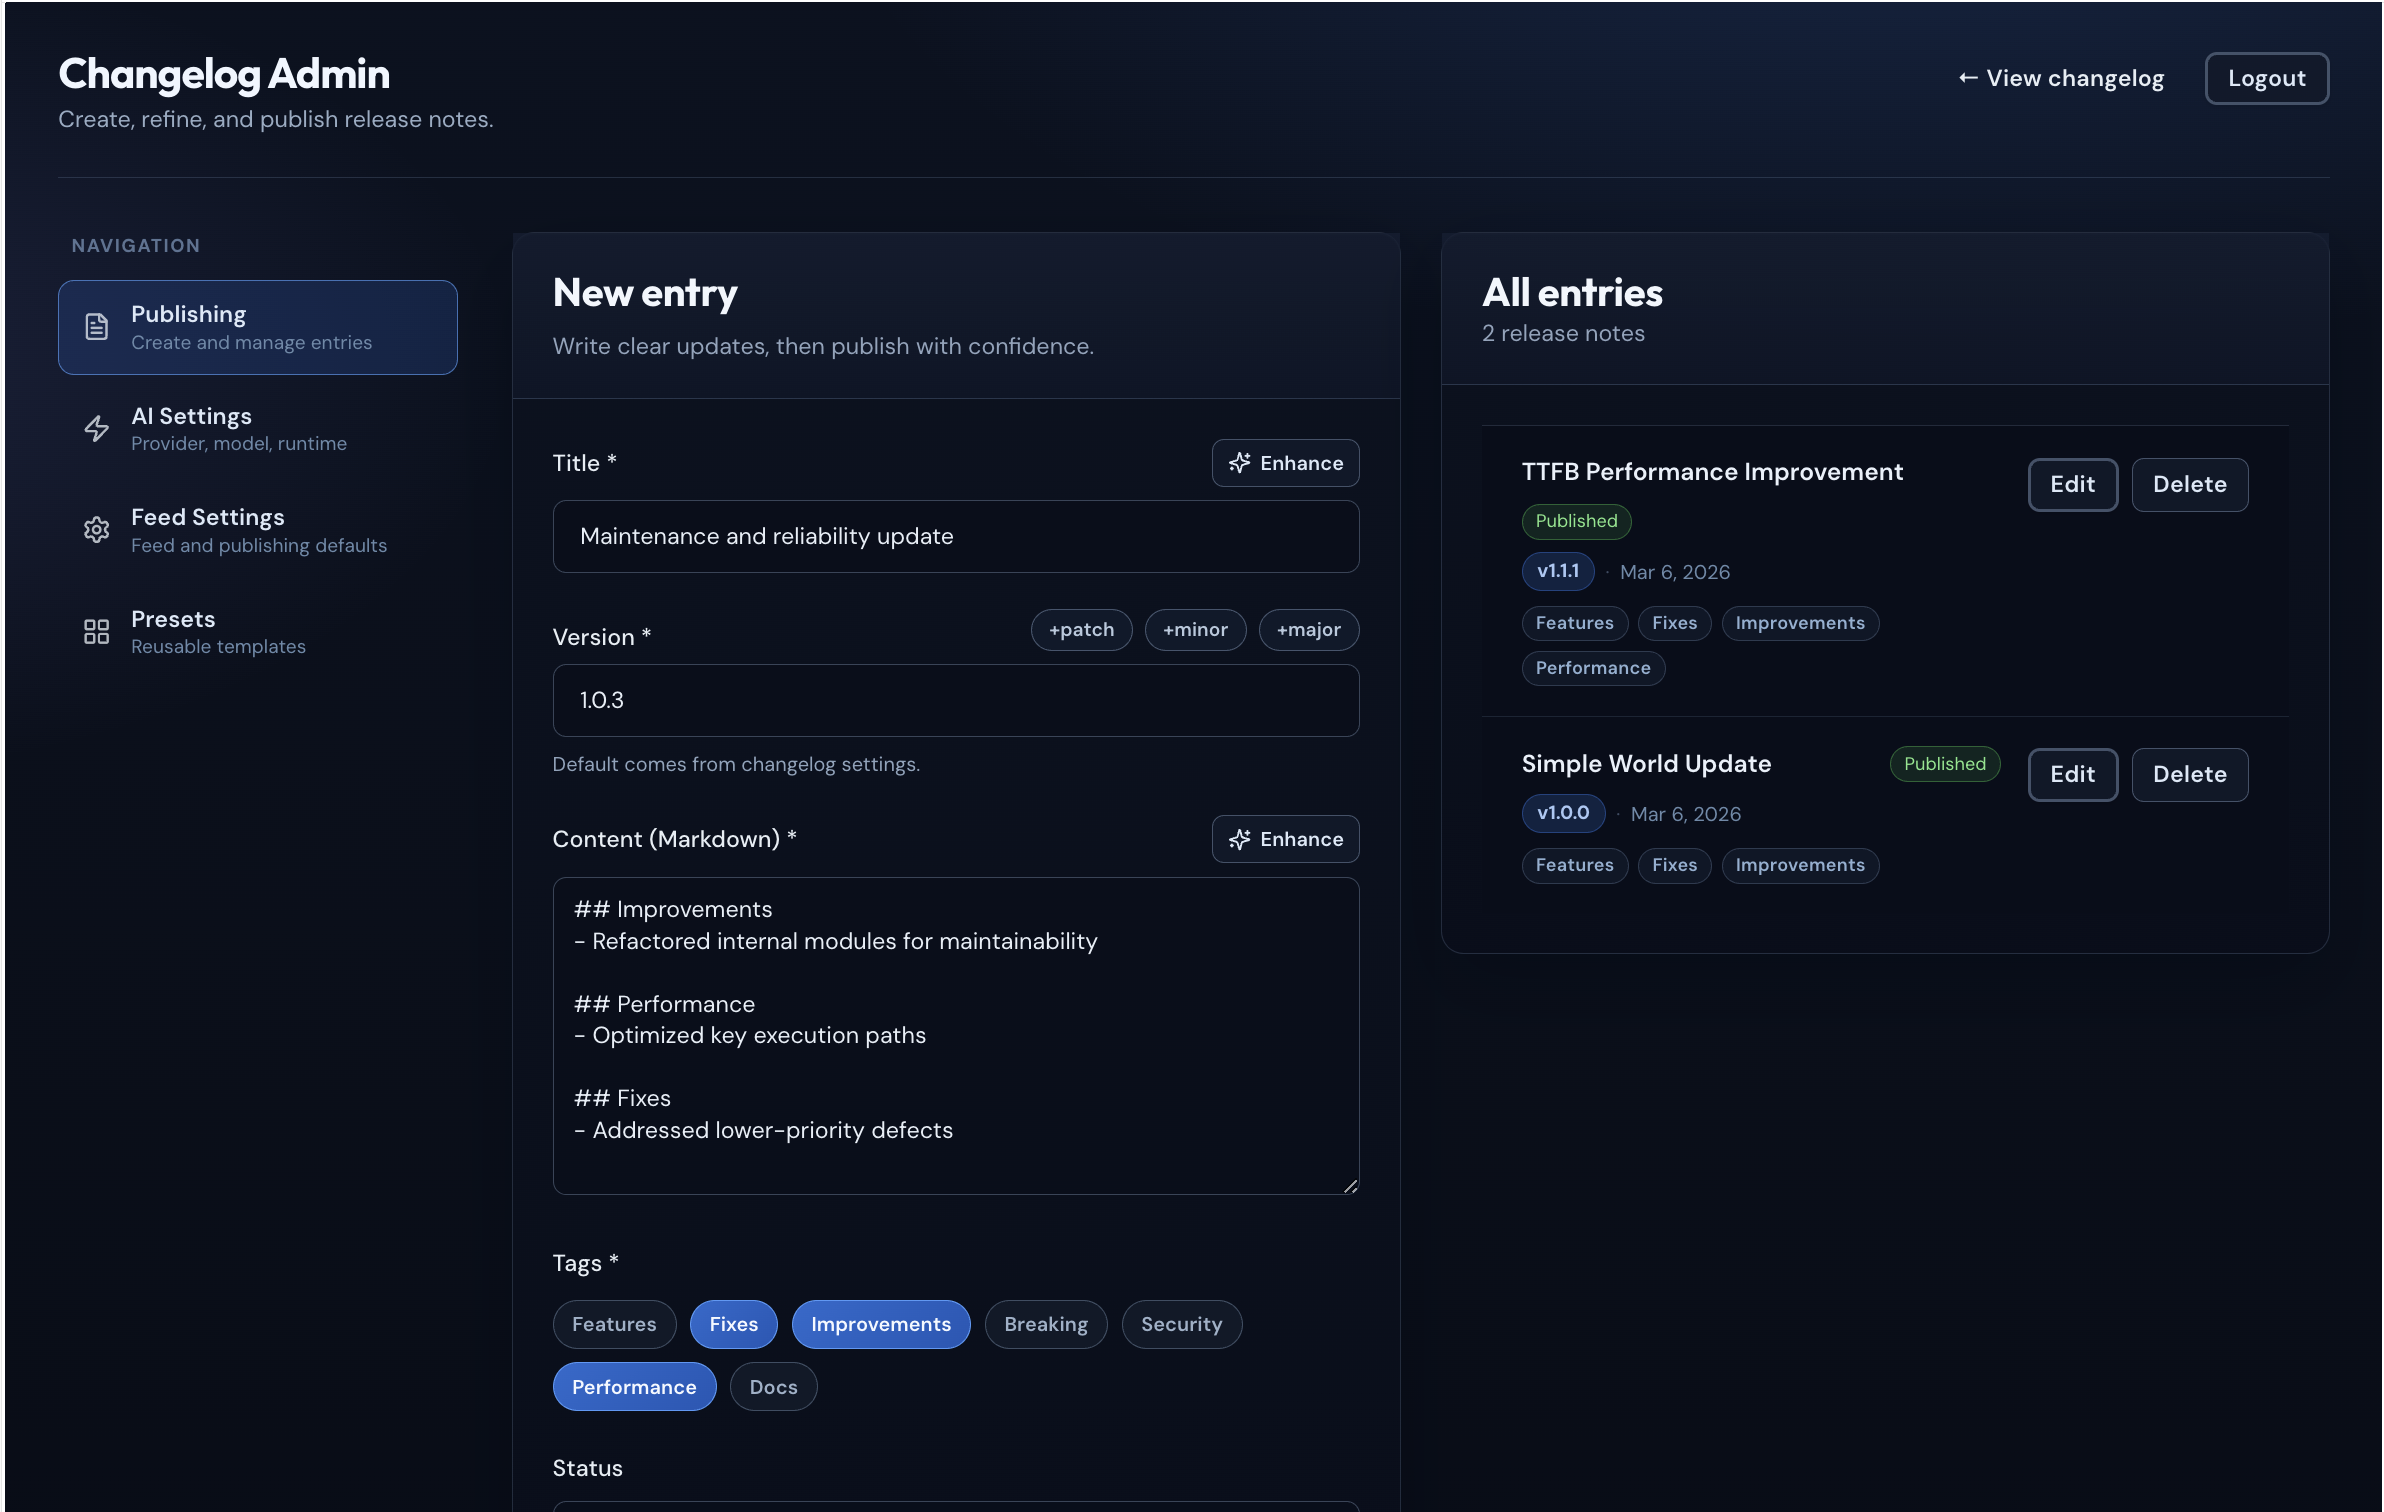
- Browse published updates at
/changelog - Search by title or content
- Filter by tags:
Features,Fixes,Improvements,Breaking,Security,Performance,Docs
- Create your first admin account at
/changelog/login(only when no admin exists yet) - Log in at
/changelog/loginwith email and password - Publish and manage entries at
/changelog/admin - Configure AI settings at
/changelog/admin/ai - Adjust feed defaults at
/changelog/admin/changelog-settings - Connect repositories at
/changelog/admin/repoto generate drafts from commits
Create your first admin user in MongoDB:
bun run create:admin your-admin@email.com your-password "Admin"- Enter raw release notes in the admin form
- Click Enhance with AI
- Review the generated title, markdown body, and suggested tags
- Edit as needed and publish
- Add a GitHub repository URL or Bitbucket workspace/slug in
/changelog/admin/repo - Provide an access token (stored encrypted in MongoDB)
- Open Generate from commits in the editor to select a date range
- Optionally enable AI polish for a standardized release-note format
Token scopes
- GitHub: use a fine-grained PAT or GitHub App token with Contents: read permission for the repository. Public repositories can be queried without authentication but are rate-limited.
- Bitbucket Cloud: use an API token with read:repository:bitbucket scope. App passwords are deprecated; new app passwords cannot be created after September 9, 2025 and existing ones stop working on June 9, 2026.
Token setup references
- GitHub commit API: docs.github.com/en/rest/commits/commits
- Bitbucket commits API: developer.atlassian.com/cloud/bitbucket/rest/api-group-commits
- Bitbucket API token scopes: support.atlassian.com/bitbucket-cloud/docs/integrate-an-external-application
- Bitbucket app password deprecation: support.atlassian.com/bitbucket-cloud/docs/app-passwords
All server actions are exported from changelog-sdk/next and can be called from any Next.js Server Component, Route Handler, or other server action.
import {
  createChangelog,
  updateChangelog,
  deleteChangelog,
  fetchChangelogBySlug,
  fetchPublishedChangelogs,
  fetchAdminChangelogs,
  fetchAdminChangelogById,
  fetchLatestPublishedVersion,
} from 'changelog-sdk/next'

// Create
await createChangelog({
  title: 'v1.2.0 Released',
  content: '## Features\n- New feature\n\n## Fixes\n- Bug fix',
  version: '1.2.0',
  status: 'published',
  tags: ['Features', 'Fixes'],
})

// Update
await updateChangelog({ id: '...', title: 'Updated title', status: 'published' })

// Delete
await deleteChangelog('entry-id')

// Fetch by slug
const entry = await fetchChangelogBySlug('v1-2-0')

// Public feed (page, limit, tags, search)
const feed = await fetchPublishedChangelogs(1, 10, ['Features'], 'dark mode')

// Admin feed
const adminFeed = await fetchAdminChangelogs(1, 20)

// Admin entry by ID
const adminEntry = await fetchAdminChangelogById('entry-id')

// Latest published semver
const { data } = await fetchLatestPublishedVersion()import { runAIEnhance } from 'changelog-sdk/next'
const result = await runAIEnhance({
rawNotes: 'Fixed auth bug, added dark mode, improved performance',
currentVersion: '1.2.0',
})
// result.data → { title, content, tags }import {
fetchRepoSettings,
updateRepoSettings,
previewRepoCommits,
generateChangelogFromCommits,
} from 'changelog-sdk/next'
await updateRepoSettings({
provider: 'git',
repoUrl: 'https://github.com/org/repo',
branch: 'main',
token: 'ghp_...',
enabled: true,
})
const commits = await previewRepoCommits({ since: '2025-01-01', until: '2025-01-07', limit: 50 })
const draft = await generateChangelogFromCommits({ since: '2025-01-01', until: '2025-01-07', limit: 50 })Automatic generation is also available from provider webhook events on the configured branch.
Before you start:
- Decide which branch should generate release notes, for example
main. - Save that branch in
/changelog/admin/repo. - Work out your public webhook URL. It is your deployed app domain plus
/api/changelog/webhooks/repo. Example:https://app.example.com/api/changelog/webhooks/repo - Reuse your existing
CHANGELOG_SESSION_SECRETas the webhook secret in GitHub or Bitbucket.
GitHub setup:
- Open the repository on GitHub.
- Go to
Settings->Webhooks. - Select
Add webhook. - Set
Payload URLto your full webhook URL, for examplehttps://app.example.com/api/changelog/webhooks/repo. - Set
Content typetoapplication/json. - Set
Secretto the same value asCHANGELOG_SESSION_SECRET. - Choose
Let me select individual eventsand enable onlyPushes. - Save the webhook.
- Merge or push a change into the watched branch.
Bitbucket Cloud setup:
- Open the repository in Bitbucket Cloud.
- Go to
Repository settings->Webhooks. - Select
Add webhook. - Set
URLto your full webhook URL, for examplehttps://app.example.com/api/changelog/webhooks/repo. - Set
Secretto the same value asCHANGELOG_SESSION_SECRET. - Enable the
Repository pushtrigger. - Save the webhook.
- Merge or push a change into the watched branch.
What happens after setup:
- The SDK verifies the webhook signature.
- The SDK checks that the payload matches the configured repository and branch.
- The SDK groups commit history into changelog sections.
- The SDK bumps the latest semantic version by one patch.
- The SDK saves a new changelog record as
draftorpublishedbased onautoPublish. - Duplicate deliveries for the same branch head are ignored.
import { loginAdmin, registerAdmin, canRegisterAdmin, logoutAdmin, checkAdminAuth } from 'changelog-sdk/next'

const isAdmin = await checkAdminAuth()      // boolean
const canRegister = await canRegisterAdmin() // { success, data: { canRegister } }
await registerAdmin({ email: 'admin@example.com', password: 'strong-password', displayName: 'Admin' })
const result = await loginAdmin({ email: 'admin@example.com', password: 'strong-password' }) // { success, error? }
await logoutAdmin()import {
fetchAISettings,
updateAISettings,
fetchAIProviderModels,
fetchChangelogSettings,
updateChangelogSettings,
} from 'changelog-sdk/next'
// AI settings
const aiSettings = await fetchAISettings()
await updateAISettings({ provider: 'openai', model: 'gpt-4o', openaiApiKey: 'sk-...' })
// List available models for a provider
const models = await fetchAIProviderModels({ provider: 'ollama', ollamaBaseUrl: 'http://localhost:11434' })
// Feed settings
const feedSettings = await fetchChangelogSettings()
await updateChangelogSettings({ defaultFeedPageSize: 20, autoPublish: false })Both adapters accept optional dependency overrides for testing or custom infrastructure.
import { createNextChangelogAdapter } from 'changelog-sdk/next'

const adapter = createNextChangelogAdapter({
  // Override any repository or port
  revalidatePathname: '/changelog',   // path passed to Next.js revalidatePath
  sessionCookieName: 'my-session',    // default: 'changelog-admin-session'
  // changelogRepository: myCustomRepo,
  // settingsRepository: myCustomRepo,
  // aiSettingsRepository: myCustomRepo,
})

// adapter.actions exposes all server action functions
const result = await adapter.actions.createChangelog({ ... })
To receive repository webhooks in Next.js, add a route handler and forward the request into the adapter:
// app/api/changelog/webhooks/repo/route.ts
import { createNextChangelogAdapter } from 'changelog-sdk/next'

const adapter = createNextChangelogAdapter()

export async function POST(request: Request) {
  const rawBody = await request.text()
  const body = JSON.parse(rawBody)
  const headers = Object.fromEntries(request.headers.entries())
  const result = await adapter.actions.processRepoWebhook({ headers, body, rawBody })
  return Response.json(result)
}import { createNuxtChangelogService } from 'changelog-sdk/nuxt'
import type { H3Event } from 'h3'
// Used inside a Nitro event handler
export default defineEventHandler(async (event: H3Event) => {
const service = createNuxtChangelogService(event, {
sessionCookieName: 'my-session',
// changelogRepository: myCustomRepo,
})
return service.getPublishedFeed(1, 10)
})If you need to build your own adapter, import the repository factories directly:
import {
  createMongooseChangelogRepository,
  createMongooseSettingsRepository,
  createMongooseAISettingsRepository,
} from 'changelog-sdk/mongoose'import type {
ChangelogEntry,
ChangelogStatus, // 'draft' | 'published'
ChangelogTag, // 'Features' | 'Fixes' | 'Improvements' | 'Breaking' | 'Security' | 'Performance' | 'Docs'
CreateChangelogInput,
UpdateChangelogInput,
EnhanceChangelogInput,
EnhanceChangelogOutput,
FeedResponse,
AISettingsInput,
AIModelOption,
AIProviderKind, // 'openai' | 'gemini' | 'ollama'
ChangelogSettingsInput,
PersistedAISettings,
PersistedChangelogSettings,
} from 'changelog-sdk/core'import {
CreateChangelogSchema,
UpdateChangelogSchema,
EnhanceChangelogSchema,
ChangelogEntrySchema,
ChangelogTagEnum,
ChangelogStatusEnum,
AIProviderEnum,
AISettingsSchema,
ChangelogSettingsSchema,
FeedFiltersSchema,
LoginSchema,
} from 'changelog-sdk/core'import { normalizeSemver, parseSemver, compareSemver } from 'changelog-sdk/core'
normalizeSemver('v1.2.3') // '1.2.3'
parseSemver('1.2.3') // [1, 2, 3]
compareSemver('1.3.0', '1.2.0') // 1 (a > b)import { DEFAULT_AI_MODELS } from 'changelog-sdk/core'
// { openai: 'gpt-4o-mini', gemini: 'gemini-2.5-flash', ollama: 'llama2' }All internal classes are prefixed with cl- to avoid collisions with host app styles.
Available utility groups:
- Typography:
cl-h1,cl-h2,cl-h3,cl-h4,cl-p,cl-code - Components:
cl-card,cl-btn,cl-input,cl-textarea,cl-badge,cl-alert - Layout:
cl-container,cl-section,cl-grid,cl-grid-cols-1,cl-grid-cols-2 - Utilities:
cl-transition,cl-truncate,cl-line-clamp-2,cl-line-clamp-3
Avoid overriding cl- prefixed selectors globally in your host app.
- Markdown sanitization via
rehype-sanitizeandDOMPurify - Zod validation on all inputs and server actions
- HTTP-only cookie sessions for admin auth with
sameSite: laxandsecurein production - Admin session tokens are HMAC-SHA-256 signed with an expiry and a random nonce — not forgeable without the secret
- Session token signing uses the Web Crypto API (
crypto.subtle) for compatibility across Edge, Node.js, and Nuxt runtimes - A 5-second clock-skew tolerance is applied during token verification for distributed environments
- Bcrypt password hashing and verification (
bcryptjs) - Configurable AI request rate limiting
- Input sanitization and bounded pagination on all repository-touching service methods
- Repository access tokens are encrypted at rest with
CHANGELOG_ENCRYPTION_KEY(AES-256-GCM) - MongoDB search inputs are regex-escaped and length-limited before use in
$regexqueries - Semver comparison prevents publishing lower or duplicate versions
Set CHANGELOG_SESSION_SECRET to a random string of at least 32 characters:
bun -e "console.log(require('crypto').randomBytes(32).toString('hex'))"The SDK also accepts NEXTAUTH_SECRET (Next.js) or NUXT_SESSION_PASSWORD (Nuxt) as fallbacks, subject to the same 32-character minimum.
Add serverExternalPackages: ['mongodb', 'mongoose'] to next.config.js (see Quick Start step 2). This prevents Next.js from bundling Mongoose, which would create duplicate connections per request.
- Confirm at least one admin exists in the
admin_userscollection (bun run create:admin ...) - Confirm the login email and password are correct
- Confirm
CHANGELOG_SESSION_SECRETis set and at least 32 characters - If registration button is missing, set
CHANGELOG_ALLOW_ADMIN_REGISTRATION=true(or create first admin via script). If you rely on a public-prefixed env var, note the adapter fallback order: Next.js →NEXT_PUBLIC_thenPUBLIC_; Nuxt →NUXT_PUBLIC_thenPUBLIC_; Express →PUBLIC_only. - Verify cookies are enabled in your browser
- Clear existing cookies and retry
- Confirm
CHANGELOG_AI_PROVIDERis set toopenai,gemini, orollama - Verify the corresponding credential is present:
- OpenAI →
OPENAI_API_KEY - Gemini →
GOOGLE_GENERATIVE_AI_API_KEY - Ollama → server running at
OLLAMA_BASE_URL
- OpenAI →
- Ensure the AI provider package is installed (e.g.
bun add ai @ai-sdk/openai)
Make sure you import changelog-sdk/styles inside the app/changelog/layout.tsx file and not in a global layout. Avoid .cl-* overrides in global CSS.
Confirm next, react, and react-dom are installed as devDependencies in your project. The SDK declares them as optional peer dependencies.
Run commands from the repository root:
bun install
bun run build
bun run type-check
bun run example:install
bun run example:dev| Script | Description |
|---|---|
bun run build |
Compile TypeScript and copy styles to dist/ |
bun run type-check |
Run tsc --noEmit across the full codebase |
bun run example:install |
Install dependencies in the example/ Next.js app |
bun run example:dev |
Start the example app dev server |
bun run example:build |
Build the example app |
bun run check:mongo |
Verify MongoDB connectivity |
bun run create:admin |
Create a MongoDB admin account |
bun run hash:password |
Generate a bcrypt hash interactively |
This repository includes a static landing page at site/index.html and a deployment workflow at .github/workflows/deploy-pages.yml.
- Open your repository Settings → Pages
- Under Build and deployment, choose Source: GitHub Actions
- Push to the
mainbranch
After deployment your landing page will be live at:
https://<your-github-username>.github.io/changelog-sdk/
MIT